
 Portal
Mk1 Minter
Page 5 of 10 • ![]() 1, 2, 3, 4, 5, 6, 7, 8, 9, 10
1, 2, 3, 4, 5, 6, 7, 8, 9, 10 ![]()
![]()
 Re: Mk1 Minter
![]() by jas_racing Tue Feb 18, 2014 11:28 am
by jas_racing Tue Feb 18, 2014 11:28 am
gtirx2 wrote:Ooh I like the engine part of a project and it looks to be coming along nicely
The bores look in great shape and I am surprised not to see a ridge,going by the small stapped numbers on the piston and lack of ridge I would proberly say it has got oversized pistons in it?
Also not seen a head crack there before which is strange,normally they may have ones between the valves but not seen them on the edge of the combustion chamber on a mk1 like that.
Also is the replacement head a mk1 or mk2 head?
The reason I ask is it looks like a mk2 inlet gasket,i think the mk1s gaskets are more egged shaped on the inlet ports.
I am not sure if this is the case as I have never checked but I would check to make sure the mk2 gasket don't interfere with the spray pattern of the mk1 injectors.
I think the top of the inlet ports on the mk1 is more egged shaped to match up with the inlet runners and injectors postion in the runners if that makes sence?
Yes the invoice for the rebuild in 1997 lists oversize pistons & rings, good spot!
Replacement head is mk1, cast date May 1987. The inlet gaskets do appear to be mk2, but correct ones with the oval shaped inlets are on order

jas_racing- 5th gear

- Posts : 314
Join date : 2013-01-29
Age : 47
Location : Peterborough
![]()
![]()
Re: Mk1 Minter
![]() by gtirx2 Tue Feb 18, 2014 12:04 pm
by gtirx2 Tue Feb 18, 2014 12:04 pm
Yeah not sure on the gaskets and the mk2 maybe fine,its just one of them things that you can over look and will bite you in the arse later lol.

gtirx2- Moderator

- Posts : 300
Join date : 2013-01-27
Age : 41
Location : Kent -

![]()
![]()

richvans- 4th gear

- Posts : 220
Join date : 2013-01-29
![]()
![]()
Re: Mk1 Minter
![]() by jas_racing Wed Feb 19, 2014 1:16 am
by jas_racing Wed Feb 19, 2014 1:16 am
gtirx2 wrote:I thought the bores looked in great shape,should be a good little runner
Yeah not sure on the gaskets and the mk2 maybe fine,its just one of them things that you can over look and will bite you in the arse later lol.
I'm hoping it'll run sweet - there's barely any crank float and everything seems good & tight in terms of mains & big-ends. I did read some stories on Sporting Fiat Club about warped blocks that kept me awake that night so I hope mine isn't one of them!
You're right about the mk2 gasket, it obscures the mk1's injectors.
jas_racing- 5th gear
- Posts : 314
Join date : 2013-01-29
Age : 47
Location : Peterborough
![]()
![]()
Re: Mk1 Minter
![]() by jas_racing Wed Feb 19, 2014 1:17 am
by jas_racing Wed Feb 19, 2014 1:17 am
I'll be buried in it!richvans wrote:Does look mint, i bet its a keeper!
jas_racing- 5th gear
- Posts : 314
Join date : 2013-01-29
Age : 47
Location : Peterborough
![]()
![]()
Re: Mk1 Minter
![]() by jas_racing Wed Feb 19, 2014 10:48 am
by jas_racing Wed Feb 19, 2014 10:48 am
Block - flywheel end - painted up and parts refitted:

And the other end:

New waterpump fitted & block face given a final clean up ready for head fitting:

Head ready to go on:

Fitted, along with new thermostat:


Rear:

Sump, cleaned up & repainted with POR engine enamel:

Fitted:

Cam-carrier refitted:

Getting there:


As it sits now:

That is all
jas_racing- 5th gear
- Posts : 314
Join date : 2013-01-29
Age : 47
Location : Peterborough
![]()
![]()
Re: Mk1 Minter
![]() by Dunc Thu Feb 20, 2014 12:19 am
by Dunc Thu Feb 20, 2014 12:19 am
Dunc

Dunc- 4th gear
- Posts : 160
Join date : 2013-04-03
![]()
![]()
Re: Mk1 Minter
![]() by jas_racing Mon Mar 24, 2014 11:14 am
by jas_racing Mon Mar 24, 2014 11:14 am
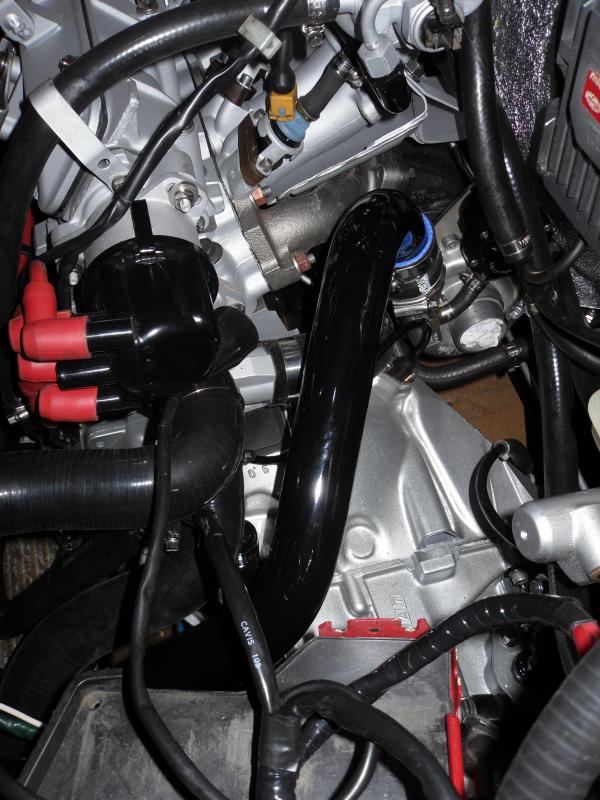
A few more parts attached to the engine...
BIG thanks to Louie for hooking me up with a good s/h exhaust manifold - the original had more holes in it than Swiss cheese & I feared it would take forever to source another (good) one. Ready for painting:

Painted (in flame-proof 'cast iron' aerosol):

Rear of engine with correct manifold gasket in place:

Manifold fitted:

This allowed me to fit the inlets:


Moving my attentions to the (new) turbo, I fitted the adjustable actuator:

I needed to make a new gasket for the turbo-to-elbow joint:

Old vs. new:

On turbo:

Elbow fitted (painted with flame-proof 'cast-iron' aersol again):

Ready to fit:

Fitted:

Heatshield on:

Dizzy cap & HT leads fitted, plus dipstick, oil pressure gauge sender, etc:


As it sits now:

Gearbox next
jas_racing- 5th gear
- Posts : 314
Join date : 2013-01-29
Age : 47
Location : Peterborough
![]()
![]()
Dunc- 4th gear
- Posts : 160
Join date : 2013-04-03
![]()
![]()
Re: Mk1 Minter
![]() by UJA Thu Mar 27, 2014 11:05 am
by UJA Thu Mar 27, 2014 11:05 am
UJA- 2nd gear

- Posts : 42
Join date : 2013-01-28
Location : Barnet, London
![]()
![]()
Re: Mk1 Minter
![]() by gtirx2 Mon Mar 31, 2014 7:15 am
by gtirx2 Mon Mar 31, 2014 7:15 am
Just to give you a little more to think about lol is the timing belt tensioner.
I originally tentioned mine that way ie downwards or anti clockwise as it seemed to make sense as the nut should almost self tighten if it did try to come loose,it also looked similar to the diagram in the manual if you can make sense of it lol.
Anyhow I found that for what ever reason my belt used to get tighter with heat and would sing once hot.
The only way around this was to run an almost silly loose cold tention as if I tensioned it normally when cold it would always sing when hot and be very tight.
I spent a while looking into this I remember and in the end come to the conclution that it should be tensioned the other way,upwards/clockwise.
Its been like this ever since and has been fine and can be tensioned normally cold now with no more singing or tightening once hot.
I am not going to tell you whats right or wrong as I am still not positive lol but just saying it maybe worth a bit of research.
gtirx2- Moderator
- Posts : 300
Join date : 2013-01-27
Age : 41
Location : Kent -
![]()
![]()

doody- 5th gear
- Posts : 316
Join date : 2013-02-04
Age : 48
Location : crowland
![]()
![]()
Re: Mk1 Minter
![]() by jas_racing Wed Apr 09, 2014 1:10 am
by jas_racing Wed Apr 09, 2014 1:10 am
gtirx2 wrote:Ooh engine porn,looks stunning mate,this car must be getting pretty close to completion
Just to give you a little more to think about lol is the timing belt tensioner.
I originally tentioned mine that way ie downwards or anti clockwise as it seemed to make sense as the nut should almost self tighten if it did try to come loose,it also looked similar to the diagram in the manual if you can make sense of it lol.
Anyhow I found that for what ever reason my belt used to get tighter with heat and would sing once hot.
The only way around this was to run an almost silly loose cold tention as if I tensioned it normally when cold it would always sing when hot and be very tight.
I spent a while looking into this I remember and in the end come to the conclution that it should be tensioned the other way,upwards/clockwise.
Its been like this ever since and has been fine and can be tensioned normally cold now with no more singing or tightening once hot.
I am not going to tell you whats right or wrong as I am still not positive lol but just saying it maybe worth a bit of research.
Thanks the the advice, much appreciated
jas_racing- 5th gear
- Posts : 314
Join date : 2013-01-29
Age : 47
Location : Peterborough
![]()
![]()
Re: Mk1 Minter
![]() by jas_racing Wed Apr 09, 2014 7:40 am
by jas_racing Wed Apr 09, 2014 7:40 am
doody wrote:is it just me but i can't see any pictures
A problem with photobucket, now sorted
jas_racing- 5th gear
- Posts : 314
Join date : 2013-01-29
Age : 47
Location : Peterborough
![]()
![]()
Re: Mk1 Minter
![]() by Big Steve Raider Wed Apr 23, 2014 7:36 am
by Big Steve Raider Wed Apr 23, 2014 7:36 am


Big Steve Raider- 1st gear

- Posts : 19
Join date : 2013-04-18
Age : 48
Location : Peterborough -
![]()
![]()
Re: Mk1 Minter
![]() by jas_racing Wed Apr 23, 2014 11:00 am
by jas_racing Wed Apr 23, 2014 11:00 am
Big Steve Raider wrote:Come on Jasslebury! Get this thread updated with all your fantastic easter hard work.....
All in good time matey
jas_racing- 5th gear
- Posts : 314
Join date : 2013-01-29
Age : 47
Location : Peterborough
![]()
![]()
Dunc- 4th gear
- Posts : 160
Join date : 2013-04-03
![]()
![]()
Re: Mk1 Minter
![]() by jas_racing Sun Apr 27, 2014 10:29 am
by jas_racing Sun Apr 27, 2014 10:29 am
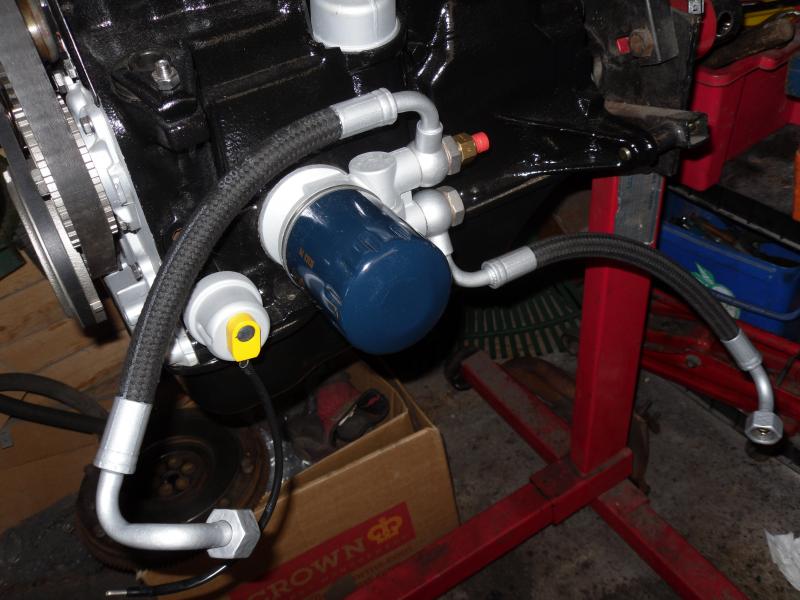
With the engine getting there I turned my attentions to the FI system, starting with the crudy looking fuel rail:
Before:

During:

After:

Fitted with refurbed injectors:


Onto plenum:

Driveshafts next...they needed rubbing down, painting and new CV joints + gaitors fitting.
Stripped and cleaned up:

Ready for painting (POR-15 + Hammerite aerosol as a top-coat):

All ready for reassembly:

Done:

Intermediate shaft, with new SKF bearing (it's a 63006 bearing if anyone's wondering):

jas_racing- 5th gear
- Posts : 314
Join date : 2013-01-29
Age : 47
Location : Peterborough
![]()
![]()
Re: Mk1 Minter
![]() by jas_racing Sun Apr 27, 2014 10:47 am
by jas_racing Sun Apr 27, 2014 10:47 am

Fitted, with new temp sensor:

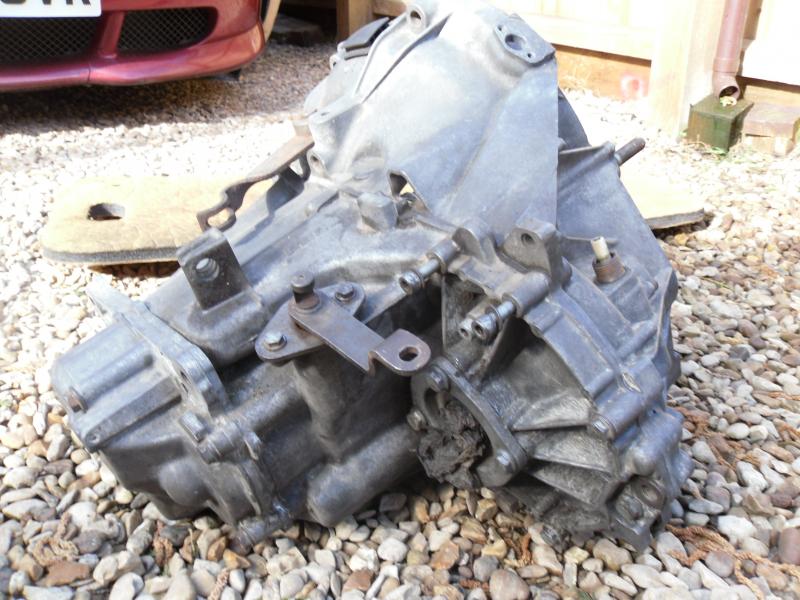
Gearbox next...it took hours and hours just to clean off all the dirt, grime & grease - I tried all sorts of products but in the end good ol' fashioned mechanical scraping was the only effective way to go. I planned to send the 'box to a local company to be stripped, checked & rebuilt but wanted it in a reasonably clean condition before I took it.
After a few hours of cleaning (not that you can tell!):

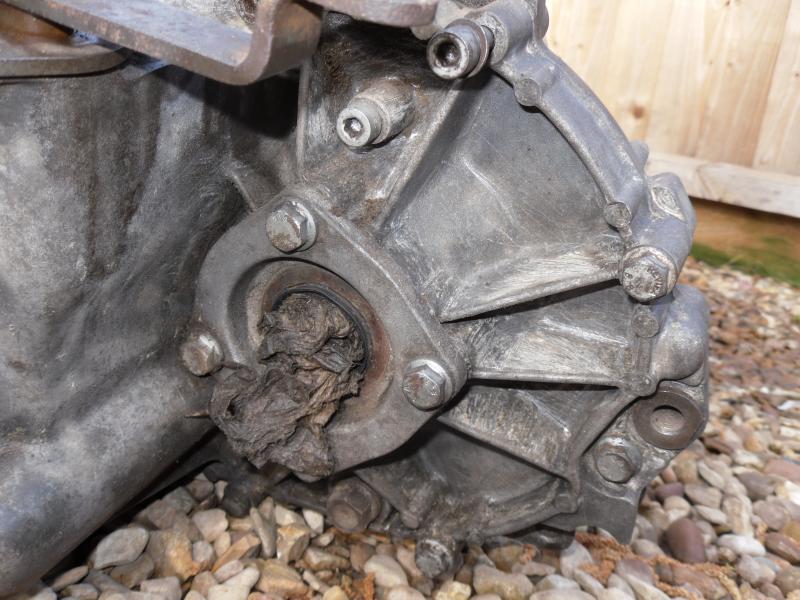

I then dropped it off with Trade Transmissions in Peterborough...after a week or so they called to say the 'box had been stripped and had "very worn" 3rd & 4th gear selector forks, so it was a good job I had it looked at! With the selector forks replaced and the whole thing reassembled I collected it to bring home for painting.
As collected (it had been through their steam-cleaner hence the streaks):


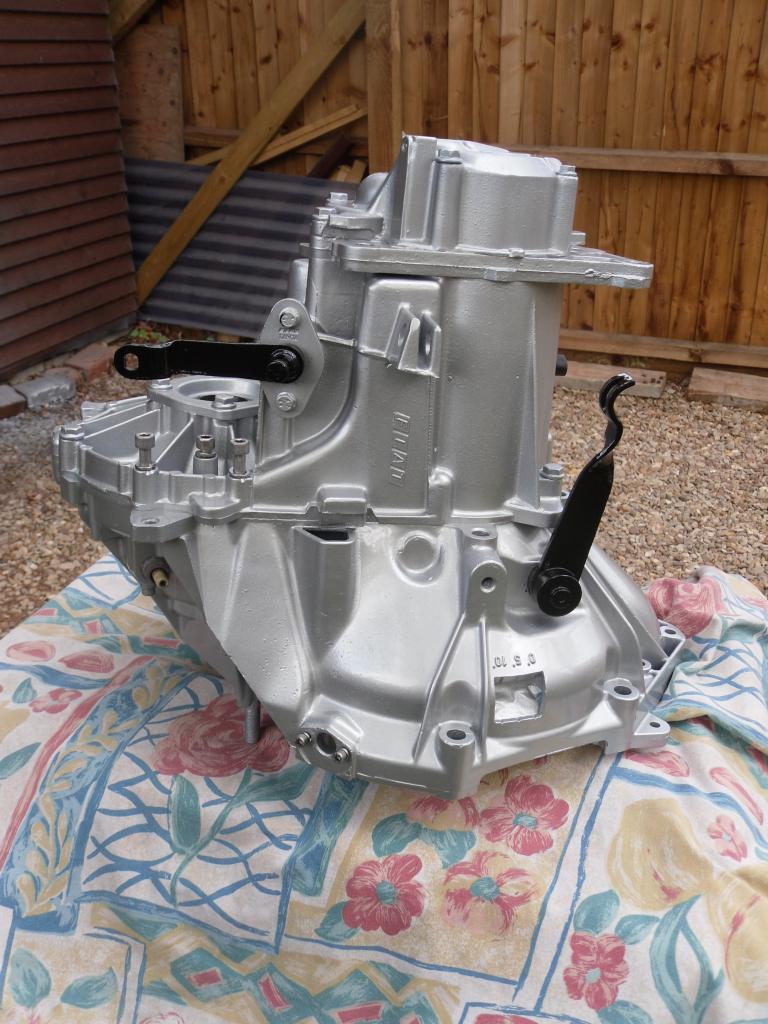
After yet more cleaning up I masked it for painting:


In high-temp primer:


High-temp base-coat on:


Lacquered + clutch lever & selector linkage painted (POR):

jas_racing- 5th gear
- Posts : 314
Join date : 2013-01-29
Age : 47
Location : Peterborough
![]()
![]()
Re: Mk1 Minter
![]() by jas_racing Sun Apr 27, 2014 11:09 am
by jas_racing Sun Apr 27, 2014 11:09 am
Engine offered up to the crane:


Flywheel & (new) clutch fitted:

Gearbox on:

Intermediate shaft installed (took a bit of jiggling and force!):

Ready to go:

Following advice on here I decided to lift the front of the car and install the engine & box from underneath:


Took a bit of effort and care to make sure things didn't catch (although some bit still did


Fitted the driveshafts:


Plenum on + a few pipes connected up:


Gear linkage, & clutch cable connected:

Intercooler to turbo pipe installed:
Intercooler to plenum pipe installed:
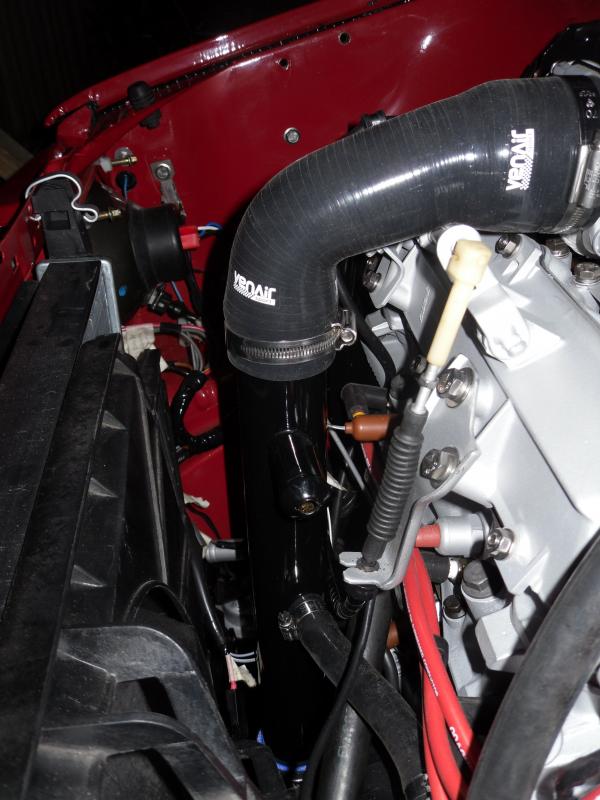
AFM to turbo (with Forge recirculating DV):


AFM & new Bosch battery fitted:


More done today but I haven't taken & uploaded the photos as yet...unfortunately it wasn't a good day as with everything connected I filled the coolant system...to find two pinholes in one of the metal coolant pipes on the turbo. Then when priming the oil system the oil cooler revealed a leak...and then when priming the fuel system the injector rail revealed a crack/leak
So near yet so far...that's all for now!
jas_racing- 5th gear
- Posts : 314
Join date : 2013-01-29
Age : 47
Location : Peterborough
![]()
![]()
Re: Mk1 Minter
![]() by Big Steve Raider Mon Apr 28, 2014 4:00 am
by Big Steve Raider Mon Apr 28, 2014 4:00 am
A real kick in the *ss with the leaks after you'd spent so long preparing and refurbishing the pipes in the first place... Still, no one said it was going to be easy...

Big Steve Raider- 1st gear
- Posts : 19
Join date : 2013-04-18
Age : 48
Location : Peterborough -
![]()
![]()
Re: Mk1 Minter
![]() by gtirx2 Mon Apr 28, 2014 6:00 am
by gtirx2 Mon Apr 28, 2014 6:00 am
Are you certain that forge bov is plumbed in the correct way around though?
gtirx2- Moderator
- Posts : 300
Join date : 2013-01-27
Age : 41
Location : Kent -
![]()
![]()
Re: Mk1 Minter
![]() by jas_racing Mon Apr 28, 2014 10:28 am
by jas_racing Mon Apr 28, 2014 10:28 am
Big Steve Raider wrote:A real kick in the *ss with the leaks after you'd spent so long preparing and refurbishing the pipes in the first place...
Tell me about it - if it wasn't for the leaks I'd have been going for a fire-up today but as it is it'll be another week or two now
jas_racing- 5th gear
- Posts : 314
Join date : 2013-01-29
Age : 47
Location : Peterborough
![]()
![]()
Re: Mk1 Minter
![]() by jas_racing Mon Apr 28, 2014 10:30 am
by jas_racing Mon Apr 28, 2014 10:30 am
gtirx2 wrote:Are you certain that forge bov is plumbed in the correct way around though?
Possibly not! I'll double check it...
jas_racing- 5th gear
- Posts : 314
Join date : 2013-01-29
Age : 47
Location : Peterborough
![]()
![]()
Re: Mk1 Minter
![]() by Dunc Mon Apr 28, 2014 10:10 pm
by Dunc Mon Apr 28, 2014 10:10 pm
Shame on the small leaks, but you'll get there.
I LOVE how mint the engine bay looks! Cleaner than new!
Dunc
Dunc- 4th gear
- Posts : 160
Join date : 2013-04-03
![]()
![]()
Page 5 of 10 • ![]() 1, 2, 3, 4, 5, 6, 7, 8, 9, 10
1, 2, 3, 4, 5, 6, 7, 8, 9, 10 ![]()
![]()


|
|
|