
 Portal
Mk1 Minter
+18
smigz
UJA
Miq
unot190bhp
Biz
Dunc
classic car lover
Chas Uno
Mintys-turbo-mk1
Big Steve Raider
doody
richvans
charliemk1
gtirx2
Unograle
hakydan
robr33gts
vern
22 posters
Page 10 of 10
Page 10 of 10 • ![]() 1, 2, 3, 4, 5, 6, 7, 8, 9, 10
1, 2, 3, 4, 5, 6, 7, 8, 9, 10
![]()
 Re: Mk1 Minter
![]() by jas_racing Sun Feb 01, 2015 5:33 am
by jas_racing Sun Feb 01, 2015 5:33 am
So, the winter work continues...nice to be able to do it all in the comfort of a garage! 
I decided to tackle the work-around on the fuel rail leak that the car had been running with since getting back on the road. I sourced a second-hand fuel rail from eBay:


Not in bad nick but still needing a spruce up...disassembled:

I originally intended to refurb both sides of the metal rail but one was slightly bent at the end (see below) so I only refurbed the side I needed.

Stripped back to bare metal with my trusty Dremel & ready to prime:

Primed:

Painted in gloss black:

I then set about removing the old rail from the engine (rather fiddly and I was trying my best not to spill petrol everywhere!) so it could be disassembled and the FPR, injectors, etc, swapped over. Old one off:

You can see the split under the head of the ferrule that caused the leak in the first place in this photo:

The work-around involved sliding a length of rubber fuel hose over the whole lot, securing it with a couple of mini pipe clamps then attaching the other end of the pipe to the FPR via an adaptor.
Old rail vs. new:

Assembled and ready to fit:

Back on the engine and as Fiat intended:

I decided to tackle the work-around on the fuel rail leak that the car had been running with since getting back on the road. I sourced a second-hand fuel rail from eBay:
Not in bad nick but still needing a spruce up...disassembled:
I originally intended to refurb both sides of the metal rail but one was slightly bent at the end (see below) so I only refurbed the side I needed.
Stripped back to bare metal with my trusty Dremel & ready to prime:
Primed:
Painted in gloss black:
I then set about removing the old rail from the engine (rather fiddly and I was trying my best not to spill petrol everywhere!) so it could be disassembled and the FPR, injectors, etc, swapped over. Old one off:
You can see the split under the head of the ferrule that caused the leak in the first place in this photo:
The work-around involved sliding a length of rubber fuel hose over the whole lot, securing it with a couple of mini pipe clamps then attaching the other end of the pipe to the FPR via an adaptor.
Old rail vs. new:
Assembled and ready to fit:
Back on the engine and as Fiat intended:

jas_racing- 5th gear

- Posts : 314
Join date : 2013-01-29
Age : 47
Location : Peterborough
![]()
![]()
Re: Mk1 Minter
![]() by jas_racing Sun Feb 01, 2015 6:03 am
by jas_racing Sun Feb 01, 2015 6:03 am
Next up was addressing various minor coolant leaks/weeps...starting with the turbo. I've never been convinced that the coolant feed & return to the turbo were 100% water tight so I fished out some replacements from my parts collection to refurb. Original feed pipe and return fitting:

Replacements ready to go:

I paid particular attention to the mating surfaces, cleaning them up as best I could. Comparison of old vs. new:

They were then fitted to the turbo with new copper washers (sorry no pictures). I also replaced all silicone coolant hoses with good old rubber versions as I don't think the silicone ones were sealing fully even with double jubilee clips (sorry no pictures again). Refilled the coolant system and all seems water tight thus far
I then turned my attentions to the driveshaft hub bolts - as they are high-tensile grade 12.9 jobbies they were self-colour and have deteriorated a little already so while the gearbox is out I thought I'd give them a lick of paint. Before:

After:

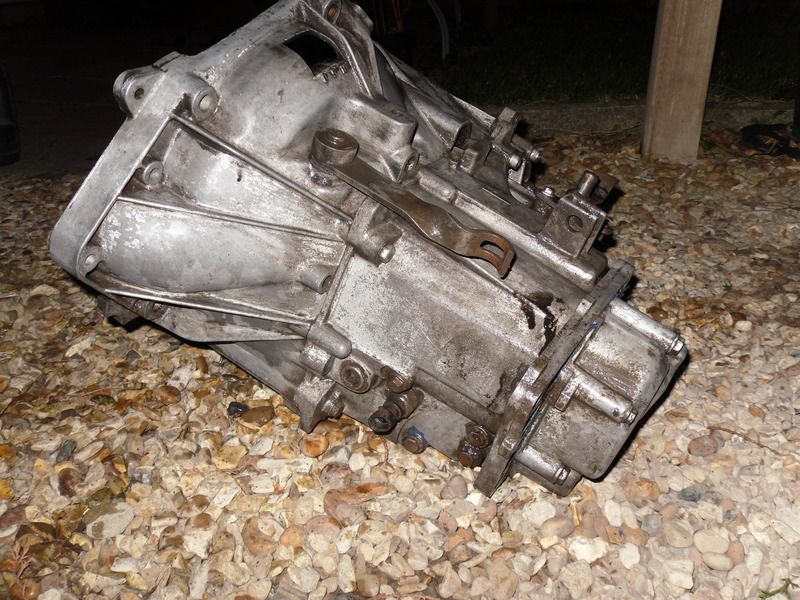
There's also progress of sorts on the gearbox rebuild front as I popped into Trade Transmissions on Tuesday to see what their verdict was on why 1st gear couldn't be selected...they've had the 'box in pieces again and checked everything with a fine-toothed comb but can't find anything wrong?! After discussion and an explanation from me that I really didn't want to refit the 'box only to find it still didn't work properly they offered to rebuild a spare unit I have for free so that's the plan I'm going with. They also didn't charge for stripping and rebuilding the original 'box a second time. The replacement 'box in question: (thanks st1allstar!)

I'll drop it in to them next week and when done it'll have the same cleaning & painting treatment as the original 'box.
A few other tinkering jobs have been done too, such as re-tensioning the cambelt, but really I'm at the position where I have to wait for the gearbox to be done before I can go any further.
Replacements ready to go:
I paid particular attention to the mating surfaces, cleaning them up as best I could. Comparison of old vs. new:
They were then fitted to the turbo with new copper washers (sorry no pictures). I also replaced all silicone coolant hoses with good old rubber versions as I don't think the silicone ones were sealing fully even with double jubilee clips (sorry no pictures again). Refilled the coolant system and all seems water tight thus far
I then turned my attentions to the driveshaft hub bolts - as they are high-tensile grade 12.9 jobbies they were self-colour and have deteriorated a little already so while the gearbox is out I thought I'd give them a lick of paint. Before:
After:
There's also progress of sorts on the gearbox rebuild front as I popped into Trade Transmissions on Tuesday to see what their verdict was on why 1st gear couldn't be selected...they've had the 'box in pieces again and checked everything with a fine-toothed comb but can't find anything wrong?! After discussion and an explanation from me that I really didn't want to refit the 'box only to find it still didn't work properly they offered to rebuild a spare unit I have for free so that's the plan I'm going with. They also didn't charge for stripping and rebuilding the original 'box a second time. The replacement 'box in question: (thanks st1allstar!)
I'll drop it in to them next week and when done it'll have the same cleaning & painting treatment as the original 'box.
A few other tinkering jobs have been done too, such as re-tensioning the cambelt, but really I'm at the position where I have to wait for the gearbox to be done before I can go any further.
jas_racing- 5th gear
- Posts : 314
Join date : 2013-01-29
Age : 47
Location : Peterborough
![]()
![]()
Re: Mk1 Minter
![]() by jas_racing Thu Apr 16, 2015 9:59 am
by jas_racing Thu Apr 16, 2015 9:59 am
So - it's been a few weeks since my last project update and my Uno is back on the road...kind of! Bringing the story up to date:
I gave the replacement gearbox as good a clean up as I could before taking it to the gearbox specialist...before:


After:


It was then taken to the gearbox specialist who stripped and examined the internals - their verdict = "it's had a hard life sir!". All bearings mullered plus 1st and 2nd gear synchro rings worn out to the point of having cracked through. The bearings weren't a problem for them to source but the synchro rings proved tricky and I ended up having to look up the Fiat part numbers via my UT microfiche and buy them from Italian eBay myself. Got genuine parts for about £25 each delivered so not too pricey really. The gearbox specialist was impressed I'd managed to find them at all! A few days after receiving the synchro rings in the post and dropping them off the gearbox was back together and ready to collect. The casings had been through their steam-cleaner but I still spent 4 hours with the Dremel getting it all ready to paint. Once done though it was masked up ready to paint:


In etch primer in my low-bake oven (aka my lounge with the heating turned up!):


Base coat applied:


Lacquered and de-masked:


Ready to install (Easter weekend):


(Also fitted a new OE input shaft seal for peace of mind)
And in!


I also fitted a new clutch with a wider release bearing from a Fiat Coupé as I wasn't satisfied with the clutch action first time around. I'm pleased to say it now feels lovely and the pedal is as light and tactile as I've ever felt on an Uno
On the subject of the pedal I fitted a new one at the same time as there was considerable wear on the original where the cable lug connects, see below for comparison of old (left) vs. new (right):

With the gearbox filled with oil, driveshafts reinstalled, gearchange linkage connected, coolant system refilled and everything I'd stripped of to gain access to the gearbox refitted/connected I turned the key and she fired up instantly
And here she is done and back at my place:


However, the delight of having her back on the road only lasted 72 hours...
To be continued!
I gave the replacement gearbox as good a clean up as I could before taking it to the gearbox specialist...before:
After:
It was then taken to the gearbox specialist who stripped and examined the internals - their verdict = "it's had a hard life sir!". All bearings mullered plus 1st and 2nd gear synchro rings worn out to the point of having cracked through. The bearings weren't a problem for them to source but the synchro rings proved tricky and I ended up having to look up the Fiat part numbers via my UT microfiche and buy them from Italian eBay myself. Got genuine parts for about £25 each delivered so not too pricey really. The gearbox specialist was impressed I'd managed to find them at all! A few days after receiving the synchro rings in the post and dropping them off the gearbox was back together and ready to collect. The casings had been through their steam-cleaner but I still spent 4 hours with the Dremel getting it all ready to paint. Once done though it was masked up ready to paint:
In etch primer in my low-bake oven (aka my lounge with the heating turned up!):
Base coat applied:
Lacquered and de-masked:
Ready to install (Easter weekend):
(Also fitted a new OE input shaft seal for peace of mind)
And in!
I also fitted a new clutch with a wider release bearing from a Fiat Coupé as I wasn't satisfied with the clutch action first time around. I'm pleased to say it now feels lovely and the pedal is as light and tactile as I've ever felt on an Uno
On the subject of the pedal I fitted a new one at the same time as there was considerable wear on the original where the cable lug connects, see below for comparison of old (left) vs. new (right):
With the gearbox filled with oil, driveshafts reinstalled, gearchange linkage connected, coolant system refilled and everything I'd stripped of to gain access to the gearbox refitted/connected I turned the key and she fired up instantly
And here she is done and back at my place:
However, the delight of having her back on the road only lasted 72 hours...
To be continued!
jas_racing- 5th gear
- Posts : 314
Join date : 2013-01-29
Age : 47
Location : Peterborough
![]()
![]()
Re: Mk1 Minter
![]() by st1allstar Thu Apr 16, 2015 6:38 pm
by st1allstar Thu Apr 16, 2015 6:38 pm
car is looking good jas, hope that box works out good for you,
the plastic y hose which goes behind the inlet?
I tried taking the one off the black car and it snapped to replace mine which had previously snapped, did you manage to buy a new one?
the plastic y hose which goes behind the inlet?
I tried taking the one off the black car and it snapped to replace mine which had previously snapped, did you manage to buy a new one?

st1allstar- Over boosting

- Posts : 539
Join date : 2013-03-01
Age : 39
Location : west mids
![]()
![]()
Re: Mk1 Minter
![]() by jas_racing Thu Apr 16, 2015 7:02 pm
by jas_racing Thu Apr 16, 2015 7:02 pm
st1allstar wrote:car is looking good jas, hope that box works out good for you,
the plastic y hose which goes behind the inlet?
I tried taking the one off the black car and it snapped to replace mine which had previously snapped, did you manage to buy a new one?
So far so good on the gearbox - it has all 5 forward gears + reverse so it's an improvement on the previous one!
I bought & fitted a white nylon Y to go behind the inlet plenum - seems to be ok although I plan to swap it for a brass one at some point in the near future. My original black plastic one cracked after being back on the car for a couple of months & no chance of getting a new OE one
jas_racing- 5th gear
- Posts : 314
Join date : 2013-01-29
Age : 47
Location : Peterborough
![]()
![]()
Re: Mk1 Minter
![]() by jas_racing Wed Apr 22, 2015 8:44 am
by jas_racing Wed Apr 22, 2015 8:44 am
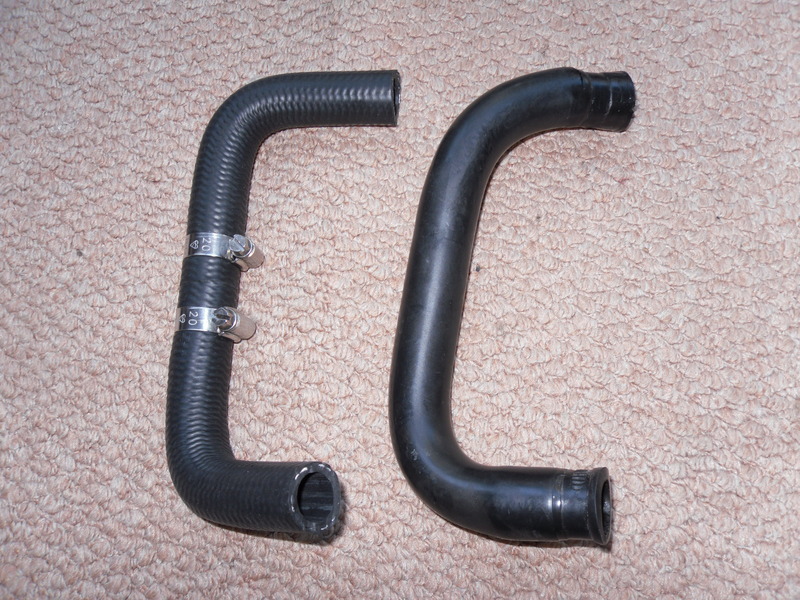
So...with my Uno back up and running on Easter Sunday and used without issue for a nice day out with the missus and her black lab on Easter Monday I then needed to push her into service from the following Wednesday onwards as my Abarth Punto went into the local Fiat dealer for some warranty work. The drive into work in my Uno on Wednesday morning was faultless but the drive home anything but...as I got home and jumped out to open the gate to my back garden I noticed a trail of fluid all the way along my drive up to and under the front end of my Uno. I quickly popped the bonnet and heard a trickling noise from the back of the block. Engine off and cue the head scratching! However, a closer inspection revealed the culprit, the pipe that runs from the heater matrix feed to the pipe on the back of the water pump:

I walked back up the road on the estate where I live and could trace the drips for about 100 metres so thankfully it seems it hadn't split too long before I got home. Although it's a 27 year old part the rubber feels soft and supple with no sign of perishing so quite why it split is a mystery?!
Little chance of finding a new OE one and I didn't fancy relying on another used one so I decided to create my own new replica from a couple of elbows and a straight allow connector:

New vs. old:
No pic of it fitted but it's just the job
While doing this job I also noticed a small wet patch on the interior carpet just to the left of the clutch pedal. A closer inspection revealed a leaking heater control valve, leaking from the spindle where the on/off tap is mounted:

Didn't fancy paying silly money for a pattern one from the UK so ordered a genuine Fiat one from Italy for less than half the price, with a new gasket too. Old (right) vs. new (new):

Subtly different but fits and works fine

With this done I could refill the coolant and fire her back up - a 25 mile test drive with a stop half way to check all was ok under the bonnet and dash and indeed it was
She's back in service for the daily commute this week too as my Punto is still at the dealer and I've run out of money for taxi's!
Another little job I did at the weekend was to fix the centre console fresh air vents - twiddling the little wheel did nothing to open or close the vents so I dissembled to have a butchers...the problem was immediately apparent; the little control arm was disconnected:

An easy-peasy fix:

Works perfectly now
That's all for now - I hope to have several months of trouble-free motoring from hereon in! *touches wood*
Pics from the 25 mile test drive mentioned above: (I'm happier with the stance now that the rear is 20mm lower than before too)


I walked back up the road on the estate where I live and could trace the drips for about 100 metres so thankfully it seems it hadn't split too long before I got home. Although it's a 27 year old part the rubber feels soft and supple with no sign of perishing so quite why it split is a mystery?!
Little chance of finding a new OE one and I didn't fancy relying on another used one so I decided to create my own new replica from a couple of elbows and a straight allow connector:
New vs. old:
No pic of it fitted but it's just the job
While doing this job I also noticed a small wet patch on the interior carpet just to the left of the clutch pedal. A closer inspection revealed a leaking heater control valve, leaking from the spindle where the on/off tap is mounted:
Didn't fancy paying silly money for a pattern one from the UK so ordered a genuine Fiat one from Italy for less than half the price, with a new gasket too. Old (right) vs. new (new):
Subtly different but fits and works fine
With this done I could refill the coolant and fire her back up - a 25 mile test drive with a stop half way to check all was ok under the bonnet and dash and indeed it was
She's back in service for the daily commute this week too as my Punto is still at the dealer and I've run out of money for taxi's!
Another little job I did at the weekend was to fix the centre console fresh air vents - twiddling the little wheel did nothing to open or close the vents so I dissembled to have a butchers...the problem was immediately apparent; the little control arm was disconnected:
An easy-peasy fix:
Works perfectly now
That's all for now - I hope to have several months of trouble-free motoring from hereon in! *touches wood*
Pics from the 25 mile test drive mentioned above: (I'm happier with the stance now that the rear is 20mm lower than before too)
jas_racing- 5th gear
- Posts : 314
Join date : 2013-01-29
Age : 47
Location : Peterborough
![]()
![]()
Re: Mk1 Minter
![]() by Duncs Thu Apr 23, 2015 3:40 am
by Duncs Thu Apr 23, 2015 3:40 am
Stunning car mate. Can I ask for your contact in Italy to order parts?

Duncs- 1st gear

- Posts : 21
Join date : 2013-06-14
![]()
![]()

jas_racing- 5th gear
- Posts : 314
Join date : 2013-01-29
Age : 47
Location : Peterborough
![]()
![]()
Re: Mk1 Minter
![]() by Duncs Thu Apr 23, 2015 8:27 pm
by Duncs Thu Apr 23, 2015 8:27 pm
jas_racing wrote:http://www.autoricambifirat.it/shop/
Thanks!
Duncs- 1st gear
- Posts : 21
Join date : 2013-06-14
![]()
![]()
Re: Mk1 Minter
![]() by jas_racing Fri Jan 08, 2016 9:18 am
by jas_racing Fri Jan 08, 2016 9:18 am
Evening All
As my Uno is now tucked up in her 'Winter Storage Facility' (aka my girlfriend's garage) until April I thought I'd post a little update. Only did about 600 miles in her last year, 200 of which were the round-trip in one day to Kidderminster, but the rest were Sunday drives out in the sun to places like Sandringham & Corby, plus I used her for my Bro's wedding (he helped me refit the engine in 2014, seemed appropriate to use her to take him to his wedding). Running sweet as a nut the whole time and surprisingly frugal on fuel consumption
One job I tackled at the end of last year was the fitting of front speakers to compliment the Rockford Fosgate units fitted in the rear door cards. I've never been sure what should be fitted in the front door pockets having never seen an Uno with speakers fitted in them?! In fact, this was a conundrum that I've wanted to solve since my first Uno in the mid-nineties (just like the digital boost gauge fix). Back then I just abandoned the plastic door pockets and made my own from MDF, fibreglass and P40 as shown below:

(Wish I still had these, they worked great)
These allowed me to fit some much larger MB Quart component units and angle them upwards & inwards for better sound staging. This time however I didn't want to go to such lengths so decided it was time to utilise the factory-fitted provision.
I could find no information at all on the t'internet about which speakers fit in the door pockets, but after some measuring up it seemed the mounting points were sized (roughly) for 5.25" units. Trouble is, any decent quality 5.25" co-axial unit is too deep to fit as there's only 50mm to play with and anything deeper will foul on the doorcard. I therefore hatched a plan to fit 4" units instead and make some adapter plates to accommodate them.
Fortuitously we have a laser-cutting machine where I work, which I have direct access to (I'm head of Technical at my company) so after a few mins on CAD the flat-pattern was sent to the machine and it spat out a couple of these: (material is 3mm gauge 304 st/st)

The speakers selected for the job were Rockford Fosgate Prime R14X2:

Bought from the 'states as they're WAY cheaper that way.
Adapter rings fitted:


St/St fixings to slot into the lugs on the back of the door pocket:


Trial fitting onto door pocket:

When rebuilding the car I fitted 'flat' speaker cable through into the doors so that it could curl up under the bottom edge of the door card discretely rather than have to cut a hole in it:

Cable soldered on and protected with heat-shrink (Mark/St1Allstar knows all about my colour-coordinated heatshrink fettish!!):


Pocket refitted and done:


Repeated for the other side and I'm very happy with the result - surprisingly weighty sound considering they're only 4" units connected to a mere 22w per channel head-unit
Onto sorting the gearstick gaitor properly next, courtesy of our new 3D printer at work
As my Uno is now tucked up in her 'Winter Storage Facility' (aka my girlfriend's garage) until April I thought I'd post a little update. Only did about 600 miles in her last year, 200 of which were the round-trip in one day to Kidderminster, but the rest were Sunday drives out in the sun to places like Sandringham & Corby, plus I used her for my Bro's wedding (he helped me refit the engine in 2014, seemed appropriate to use her to take him to his wedding). Running sweet as a nut the whole time and surprisingly frugal on fuel consumption
One job I tackled at the end of last year was the fitting of front speakers to compliment the Rockford Fosgate units fitted in the rear door cards. I've never been sure what should be fitted in the front door pockets having never seen an Uno with speakers fitted in them?! In fact, this was a conundrum that I've wanted to solve since my first Uno in the mid-nineties (just like the digital boost gauge fix). Back then I just abandoned the plastic door pockets and made my own from MDF, fibreglass and P40 as shown below:
(Wish I still had these, they worked great)
These allowed me to fit some much larger MB Quart component units and angle them upwards & inwards for better sound staging. This time however I didn't want to go to such lengths so decided it was time to utilise the factory-fitted provision.
I could find no information at all on the t'internet about which speakers fit in the door pockets, but after some measuring up it seemed the mounting points were sized (roughly) for 5.25" units. Trouble is, any decent quality 5.25" co-axial unit is too deep to fit as there's only 50mm to play with and anything deeper will foul on the doorcard. I therefore hatched a plan to fit 4" units instead and make some adapter plates to accommodate them.
Fortuitously we have a laser-cutting machine where I work, which I have direct access to (I'm head of Technical at my company) so after a few mins on CAD the flat-pattern was sent to the machine and it spat out a couple of these: (material is 3mm gauge 304 st/st)
The speakers selected for the job were Rockford Fosgate Prime R14X2:
Bought from the 'states as they're WAY cheaper that way.
Adapter rings fitted:
St/St fixings to slot into the lugs on the back of the door pocket:
Trial fitting onto door pocket:
When rebuilding the car I fitted 'flat' speaker cable through into the doors so that it could curl up under the bottom edge of the door card discretely rather than have to cut a hole in it:
Cable soldered on and protected with heat-shrink (Mark/St1Allstar knows all about my colour-coordinated heatshrink fettish!!):
Pocket refitted and done:
Repeated for the other side and I'm very happy with the result - surprisingly weighty sound considering they're only 4" units connected to a mere 22w per channel head-unit
Onto sorting the gearstick gaitor properly next, courtesy of our new 3D printer at work
jas_racing- 5th gear
- Posts : 314
Join date : 2013-01-29
Age : 47
Location : Peterborough
![]()
![]()
Re: Mk1 Minter
![]() by st1allstar Fri Jan 08, 2016 9:27 am
by st1allstar Fri Jan 08, 2016 9:27 am
good idea on the adapter plate Jeremy, I have vibe speakers in mine they sound really rubbish though, which I think suits the car
the rear door cards in my black mk1 turbo still had the original speakers in them so I am really not sure what the original stereo was like as there is 6 speaker places, all 4 door cards and next to the parcel shelf?
the rear door cards in my black mk1 turbo still had the original speakers in them so I am really not sure what the original stereo was like as there is 6 speaker places, all 4 door cards and next to the parcel shelf?
st1allstar- Over boosting
- Posts : 539
Join date : 2013-03-01
Age : 39
Location : west mids
![]()
![]()
Re: Mk1 Minter
![]() by vern Fri Jan 08, 2016 9:28 am
by vern Fri Jan 08, 2016 9:28 am
Top work mate loving the speaker upgrade, want to upgrade all 4 in mine in the oem places so no cutting any holes any where.
Need some big powered speakers but 10cm
Need some big powered speakers but 10cm

vern- Moderator

- Posts : 274
Join date : 2013-01-27
Location : East sussex
![]()
![]()
Re: Mk1 Minter
![]() by jas_racing Sat Jan 09, 2016 1:43 am
by jas_racing Sat Jan 09, 2016 1:43 am
st1allstar wrote:good idea on the adapter plate Jeremy, I have vibe speakers in mine they sound really rubbish though, which I think suits the car
the rear door cards in my black mk1 turbo still had the original speakers in them so I am really not sure what the original stereo was like as there is 6 speaker places, all 4 door cards and next to the parcel shelf?
I didn't think the rear quarter cards had speakers in them from new? I've certainly seen plenty of cards without holes cut in them. I always figured it was just the 4" jobbies hanging under the rear shelf supports and something in the front door pockets to give 4 speakers in total? Even with 6 speakers back in the 80's I dare bet the sound wasn't great considering the poor quality of car audio gear in those days!
jas_racing- 5th gear
- Posts : 314
Join date : 2013-01-29
Age : 47
Location : Peterborough
![]()
![]()
Re: Mk1 Minter
![]() by jas_racing Sat Jan 09, 2016 1:49 am
by jas_racing Sat Jan 09, 2016 1:49 am
vern wrote:Top work mate loving the speaker upgrade, want to upgrade all 4 in mine in the oem places so no cutting any holes any where.
Need some big powered speakers but 10cm
10cm ain't much but if you wanna go with them for the front door pockets I can laser-cut another couple of adapter plates for you if you like.
They sound good in my car but that's largely due to the head-unit I've got in there - a Blaupunkt from the mid-nineties that cost a small fortune but thanks to a very clever built-in self-calibrating parametric equaliser it makes even the most average of speakers sound fantastic. The difference in clarity and staging is remarkable when turning the function on & off. Never understood why Blaupunkt dropped it after a few years?!
jas_racing- 5th gear
- Posts : 314
Join date : 2013-01-29
Age : 47
Location : Peterborough
![]()
![]()
Page 10 of 10 • ![]() 1, 2, 3, 4, 5, 6, 7, 8, 9, 10
1, 2, 3, 4, 5, 6, 7, 8, 9, 10
![]()


Page 10 of 10
Permissions in this forum:
You cannot reply to topics in this forum|
|
|