
 Portal
Mk1 uno turbo how it started
Page 1 of 2 • 1, 2 ![]()
![]()
 Mk1 uno turbo how it started
![]() by gtirx2 Sun Jan 27, 2013 12:29 pm
by gtirx2 Sun Jan 27, 2013 12:29 pm
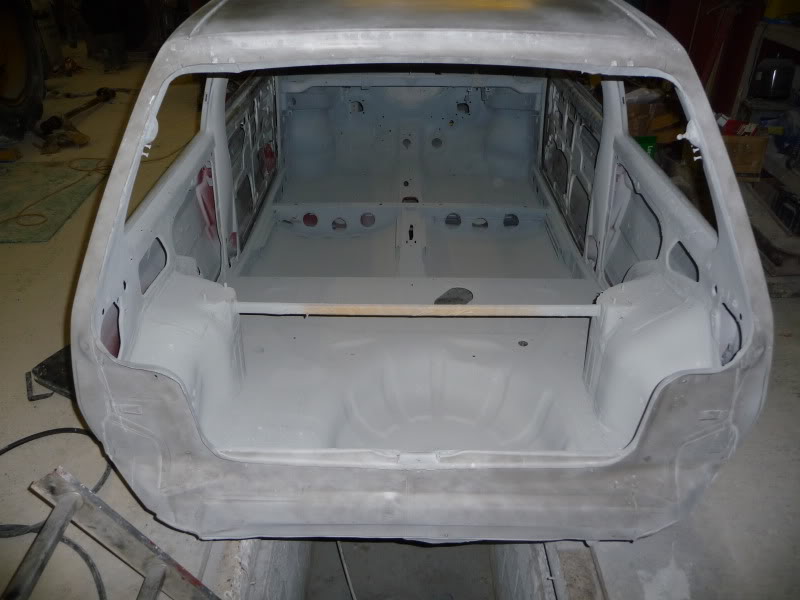
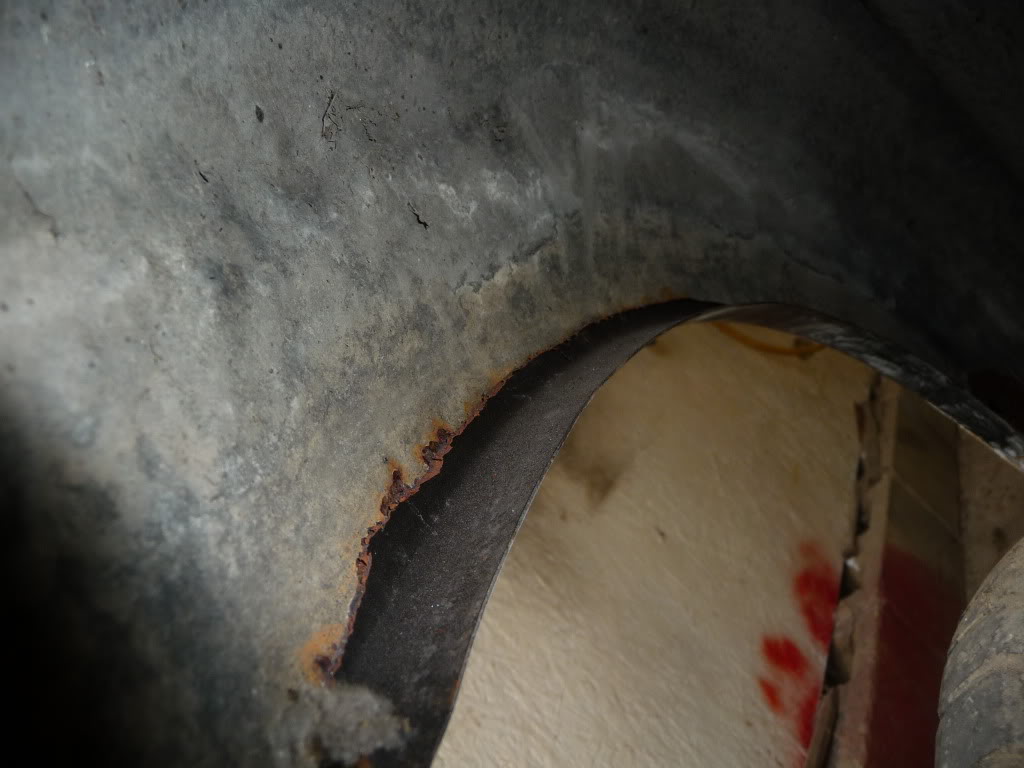
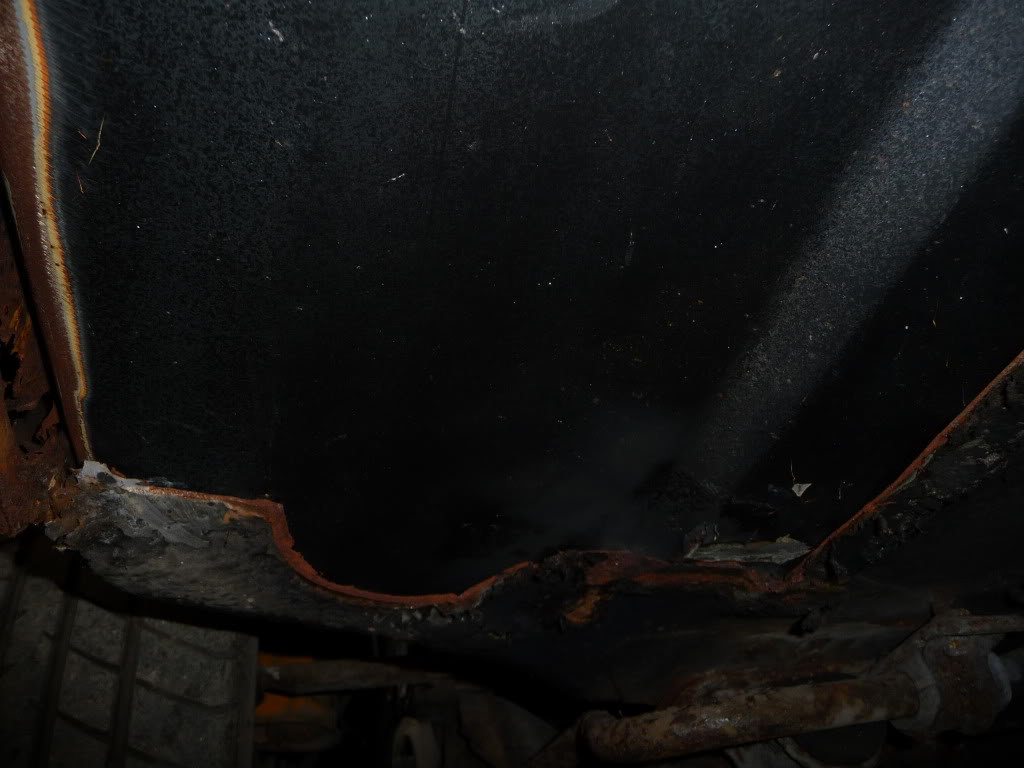
Well here is the rot box and how it started.
My history with the uno turbo started around 9 years ago when i brought Bruno (e153 goo) named by a friend that i lent him to once (he also loved it).
Bruno cost i think £100 and was as rotten as can be, all sills,turrets bodywork etc but i still saw the potensal in it.
It was never going to be a minter so me and my dad just welded it up best we could, bodged but safe and i went from there.
Bruno in the early years used to be green with a black bonnet, white boot, one blue door and one fire damaged grey door,that was until a mate crashed his uno then i had to red doors with door locks bonus!
I have to admit i quite liked this look, as the amount of people that would look at it and laugh would soon not be smiling lol.in the end it was rattle canned matt black.
Back then i was 17-18 i think and was a bit of a boy racer, and i would go as far as saying bruno was proberly one of the fastest fwd cars in my area.
I loved this car and even tho i did not do the body work i spent money else where on engine interior etc and the buzz of this little car has never left me.
I moved on to pulsar gtirs after the uno and still own a gtir which is going to be a track car now as i have modded it a bit too much for the road now really, and i fancyed another mk1 uno t for the road,cheap tax goodish fuel economy perfect.
This is the car i have brought...


I have seen the comments on here about this car and i have to say they are all true lol
The trouble is mk1 ut dont really come up that often and this one was local to me and the seller has a load of spare parts that came with the car so i went for it.
I have to say the seller was also a top chap and was really into his mk1s as much as me.
I payed £400 which may well be to much as mentioned in the thread on here, but tbh i have not seen many mk1s for sale local ish recentally go for this sort of money.
That white one on ebay went for £800odd,but saying that it was running lol.
I am doing this car on a very tight budget which many of you an here will proberly not like and altho you can buy a good running mk1s for a grand+(if you can find one) i bet they will be rusted and bodged from the past anyhow so i have started with one that i can repair myself.
Engine is no problem for me as i have a lot of spares and if i do it myself i should know it will be ok,thats unless i can find a cheap running mk1 engine to drop in temperarly.

gtirx2- Moderator

- Posts : 300
Join date : 2013-01-27
Age : 41
Location : Kent -

![]()
![]()
Re: Mk1 uno turbo how it started
![]() by gtirx2 Sun Jan 27, 2013 12:29 pm
by gtirx2 Sun Jan 27, 2013 12:29 pm

Hhhmm tidey!

Welds are a bit rough and need grinding down a bit


Needs a bit of tweakage


gtirx2- Moderator
- Posts : 300
Join date : 2013-01-27
Age : 41
Location : Kent -
![]()
![]()
Re: Mk1 uno turbo how it started
![]() by gtirx2 Sun Jan 27, 2013 12:30 pm
by gtirx2 Sun Jan 27, 2013 12:30 pm
Anyway the seller says the engine has done 67000miles,if this is true i do not know but the bores and pistons seem to be in good condition.
The bores do have a slight ridge(i have not seen a mk1 block without a ridge yet!)And you can still just about see the orginal hone marks in the bores so i am just going to give it all a good clean up and reuse the original pistons and rings as i am saving my new rings for a future rebuild on another engine.
As for the bottom end,I got a spare engine/bottom end with the car that had been sitting in a shed with half a roof for the last 6 years.
On first inspection it looked like a scrapper, but the owner said that it was once a really good engine that he was rebuilding but he had changed the shells and the bottom end kept locking up.
In the end he got fed up with it and threw it in the shed.
This engine had no head on it all this time in the shed, and the pistons where badly corroded and seized in the rusty bores.
Once stripped however and on closer inspection it seems he was putting the main caps on in the wrong place and thats why the crank kept locking up!
Anyhow on checking the crank it appears to be in mint freshly reground condition and has no corossion on the journals at all!
It also has a new set of clevite big end bearings in it,result!
I have measured the crank and it has been reground -10thou mains and big ends, the same as my spare reground crank.
So i have used my new +10 main shell from my spare crank and his clevite +10 big ends and been plastigauge-ing it this afternoon.
They have all come out between 1.5-2thou max so i think it is alright.
Although i cant find the clearences in the manual, i think this is around the correct clearence for main and big end journals of this size?
I have also checked the bores with a bore gauge and they seem all ok,and i have checked the block deck for flatness and that is also all good so hopefully i should have a half good engine soon :supz:
If anyone can help in the above thread it would be a great help,thanks!
Also thought i would post a couple of pics of the uno tat that i got with the car and that i had left from mine lol.
Got to be a good engine here somewhere?
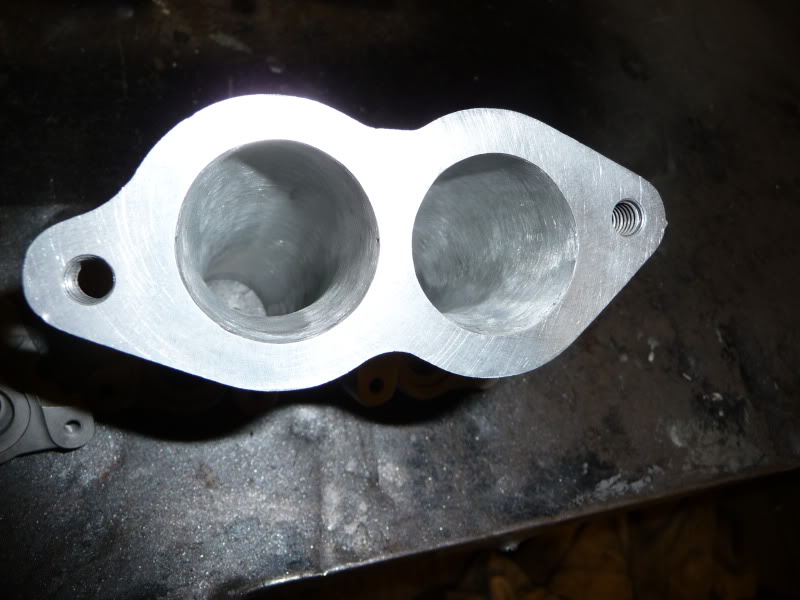
Going for the mk1 inlet manifold record!
Decided to re-ring this engine now as i broke an oil ring putting them back in
Proberly for the best though as i then took an old top ring off a piston and had a quick measure of the to ring gap and it was something like 1.1mm
Tryed the new top ring in there and checked the gap and its around 0.50-0-55mm.
Still slightly on the large side but should be fine (i hope lol)
Have taken the block to the engineers and he has had a look and measured the ridge and i think its just inside the spec in his manuel for bore wear but just outside the specs suppled with the rings.
I think he said his book said .008"? And if i remember right in the ring instructions it mentions 0.15mm(.006") max for an 80mm bore,my bore ridges measured around .007"-.008" i think.
Either way i think he is going to taper the bottom of the bore ridge and hone the bores lightly.
He may also be chamfering my top rings aswell and that will solve the worrys i have about the different stroke of the 1299c-1301cc cranks.
Thats if all the bores turn out ok and are not to tapered or ovaled.
Will update when i find out.
On the plus side though i have found a very good condition oil pump, in that rusty engine the seller had in his shed!
You would of chucked it in the bin to look at it as this engine had also sat in this shed with no sump and the oil pick up had rusted to bits lol.
Stripped it and measured it and its in great condition,not much wear atall
Edited: due to measurements being phrazed wrong and incorrect.
Think they are written correct now, but basicly when i got my block back the bore ridges measured around .004" where he had tapered them slightly.
The good news was that the only place the bores seem to wear this much is 3-4mm under and around the bore ridge mainly on the thrust face sides of the pistons when they are at tdc.
The rest of the bore is not worn anyway near as much as the hollow under the bore ridge measures.
For example the rest of my bores only measured .0003"-.0004" difference from the very top of the bore and then from under the bore ridge hollow downwards.
And overall the bores were worn by .0015"-.002" so right in/on the max bore diameter at 80.55mm.
Thought i would post that up as it may help someone else considering a re-ring.
When you first see feel the bore ridge you just assume the rest of the bore is as badly worn but this is not always the case.
Although i do have other blocks with .012"-.014" bore ridges and with this size ridge the rest of the bores will most proberly be worn out of the max diameter spec.
I think around a .008"-.010" bore ridge is proberly the most you will get away with in keeping it all within the max bore diameter specs, and also in being able to taper/chamfer the bore ridge slightly to get that within the ring specs.
Well i have got my block back and the good news is the engineer said that it was not as bad as he first thought and that the bore ridge should not be a problem and that it all went well.
So in the end all he had to do was give it a light hone and taper the ridge slightly.
Still hopeing that the different stroke cranks dont bite me in the **** but as far as i can tell the cranks are the same.
Numbers are all the same and they both came out of B stamped blocks,if that even means anything?So fingers crossed.
After measuring everything up and spending hours cleaning it was time to start slapping the old girl together.
Heres a few pics...


Also found a different camshaft as mention in another thread.
Had a rough measure and it comes out at around 9mm lift in/ex and 260ish duration.
Just hope it will not hurt the performance as i am still trying to find out for sure what its came out of?

Onto the head and inlet next which i have already made a start on, so it should all come together over the next week or so.
Then its back to the welding!
gtirx2- Moderator
- Posts : 300
Join date : 2013-01-27
Age : 41
Location : Kent -
![]()
![]()
Re: Mk1 uno turbo how it started
![]() by gtirx2 Sun Jan 27, 2013 12:31 pm
by gtirx2 Sun Jan 27, 2013 12:31 pm
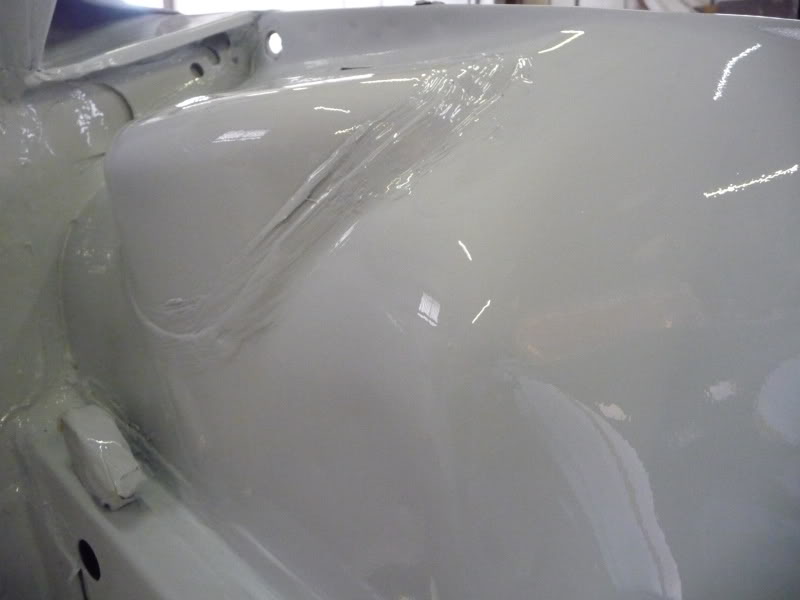
God dam paint is still tacky in places and it has had a good 3 days to dry!
I must of been a bit heavy handed with the hammerite
Slowly coming together but tbh i am spending to much time tarting the engine up :oops:When i should be welding
And we all know when you put a bit of effort into an engine it will be the most unreliable oil leaking,over heating ******* there is!
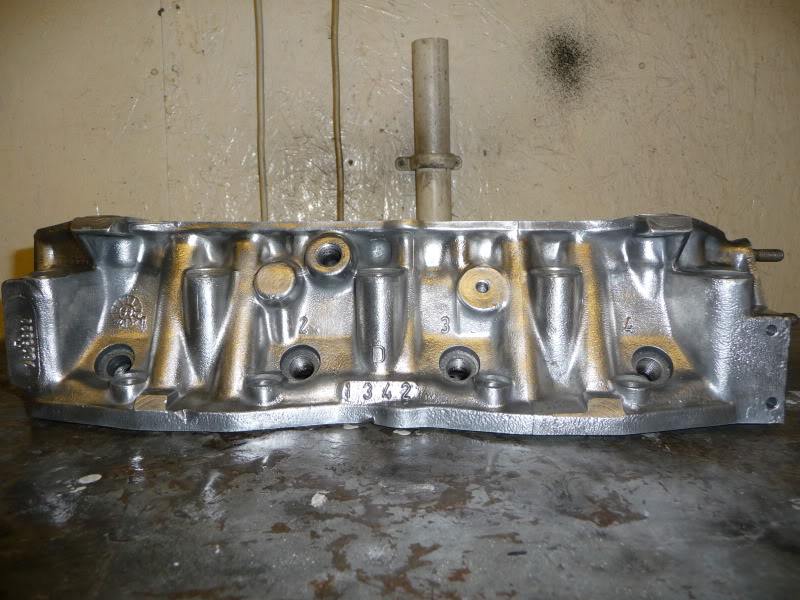
Have also lightly ported the inlet manifold and head to an 80 grit cartridge roll finich and have shimmed the cam up and preped the head(lapped valves in etc).
Just need to get it skimmed next week and it will be ready to bolt on.
Few pics of the block.


Fully stripped, sandblasted and cleaned my alternator and starter.
Surprising the amount of crap that came out of these lol,but saying that they are 20+ years old!
Renewed the brushes in the alternator as they were worn,brushes in starter still have life left in them so left them alone as they are tricky to change.
Alternator bearings felt surprisingly good so left them in aswell.
Tested them the best i can on the bench and they all seem to be working,happy days


gtirx2- Moderator
- Posts : 300
Join date : 2013-01-27
Age : 41
Location : Kent -
![]()
![]()
Re: Mk1 uno turbo how it started
![]() by gtirx2 Sun Jan 27, 2013 12:31 pm
by gtirx2 Sun Jan 27, 2013 12:31 pm
I have very lightly ported the inlet ports to an 80 grit cartridge roll finich just to get the worst of the casting marks out,and cleaned all the carbon out of the exhaust ports and combustion chambers.
I have also cleaned up and lapped in all the valves and fitted new oil seals.
The valve guides were in resonable condition so i have left them alone.
A few pics...


Got a few more bits bolted onto the beasty,also had a couple of troubles along the way!
First up was the exhaust manifold.
The flange to the turbo had badly corroded and needed skimming but getting the old studs out of the manifold was a complete balls ache!
And it has to be said that without the help of my old man on this one i would of completly messed it up.
My old man has super sonic patients where as i have absolutely none
Even the engineer that skimmed the manifold turned down the job of getting these studs out as they were that seized!
I also got a crack welded up on the manifold when it was sent for skimming, just for peace of mind as it was not yet leaking but the crack had gone right though.
Next fcuk up was that i had picked out the best looking/feeling water pump and bolted it all up only to find out the pulley was not sticking out as far on the shaft as it should and was making the fan belt run out of line
The water pump must have been for a mk2 at a guess so i had to swap that out for another one and make a new gasket out of gasket paper, as the gasket set dont seem to come with a new gasket?
The rest has gone pretty well and i am slowly getting there now with the engine.
Heres a few piccys.
The unknown camshaft all shimmed up and ready to go,its either going to make or breck this engine as i am still not sure what it has came out of orginally.

Comparison shot of stock mk1 ihi vs turbo dynamics stage2

I also ran the carbide burr down the exhaust manifold to get the worst of the marks and crusty crap out of the thing.

The skimmed exhaust manifold flange with my not quite finiched annealed copper gasket.

Lightly ported intake manifold runners.
Also got my flywheel skimmed with a 0.5 mm step.
The lack of a good step could well of been the reason the clutch used to slip on my old uno?

Just a couple of pipes and some new copper washers for the turbo feed pipe and i should be done back here.


gtirx2- Moderator
- Posts : 300
Join date : 2013-01-27
Age : 41
Location : Kent -
![]()
![]()
Re: Mk1 uno turbo how it started
![]() by gtirx2 Sun Jan 27, 2013 12:32 pm
by gtirx2 Sun Jan 27, 2013 12:32 pm
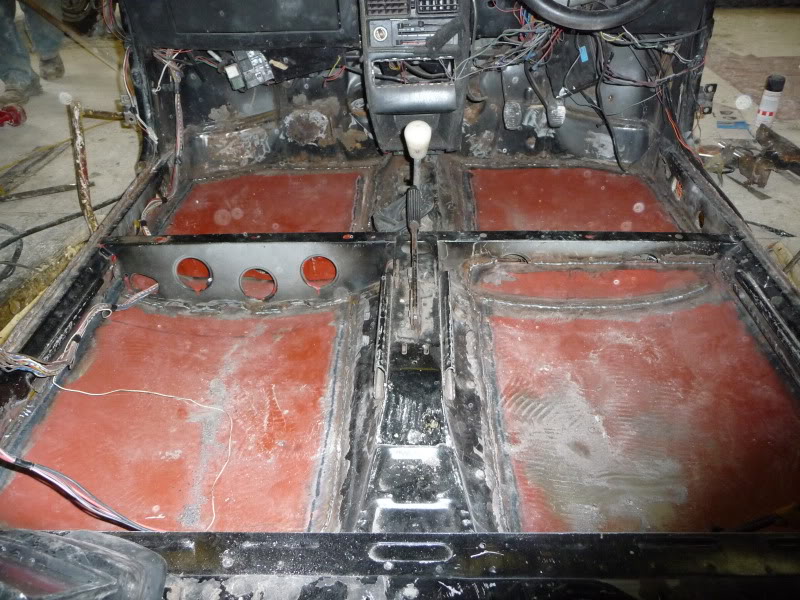
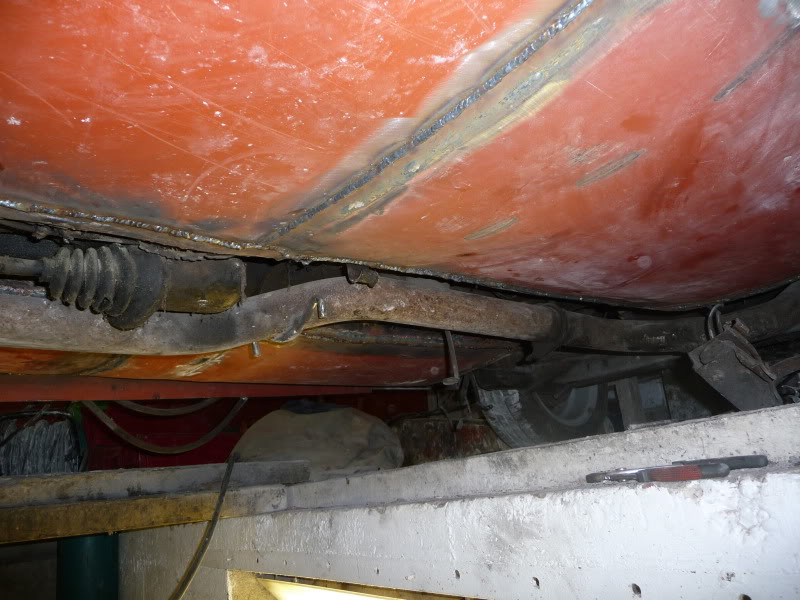
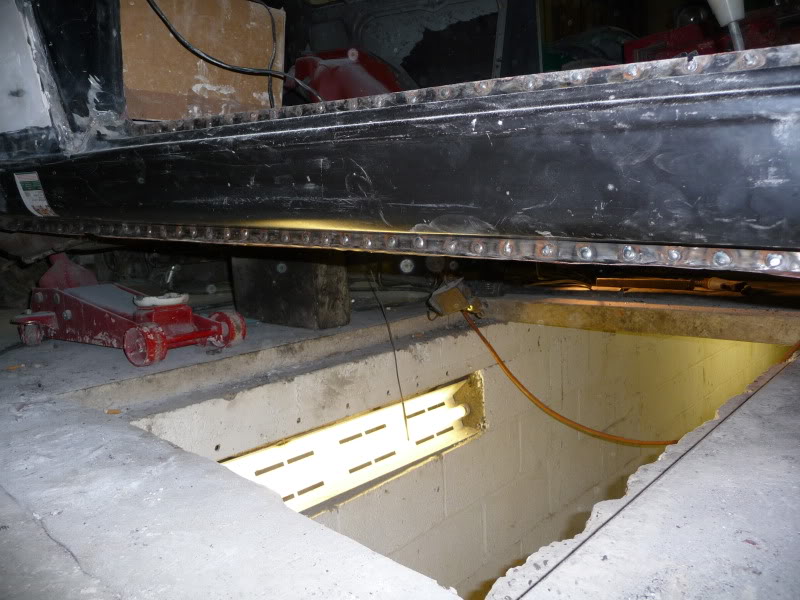
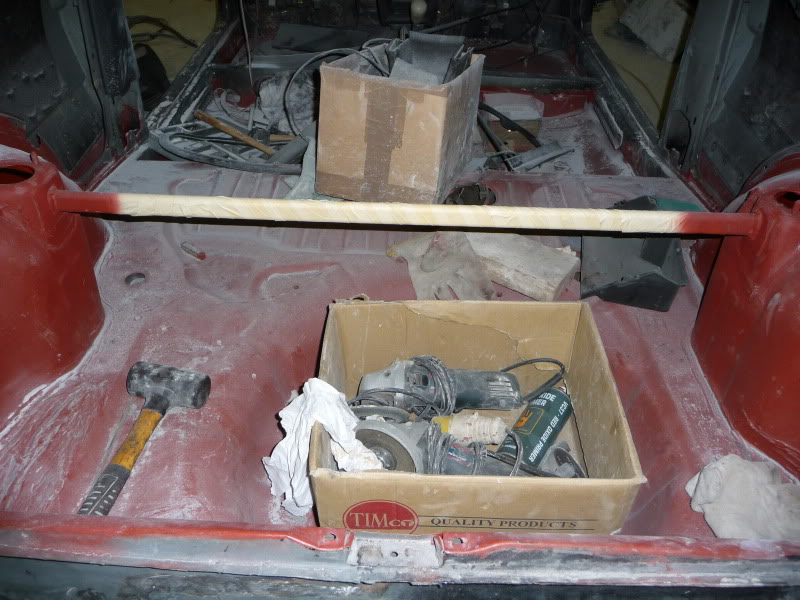
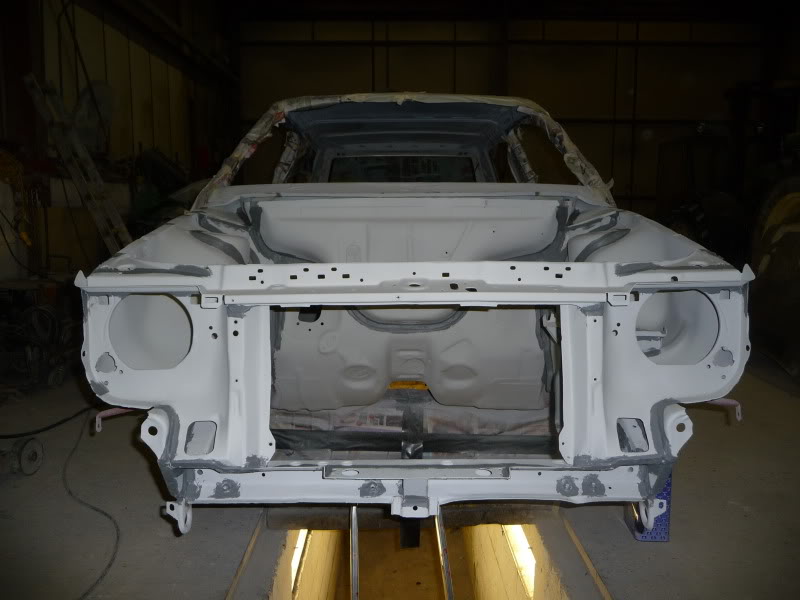
I have managed to get the car up my place of work as there is a pit up there which makes it easyer to weld underneath and keeps my neighbours happy.
I have also changed the gas i was using with the welder to a argon co2 mix instead of just co2 which has greatly helped with the welding,i will never again use just co2 on thin metal.
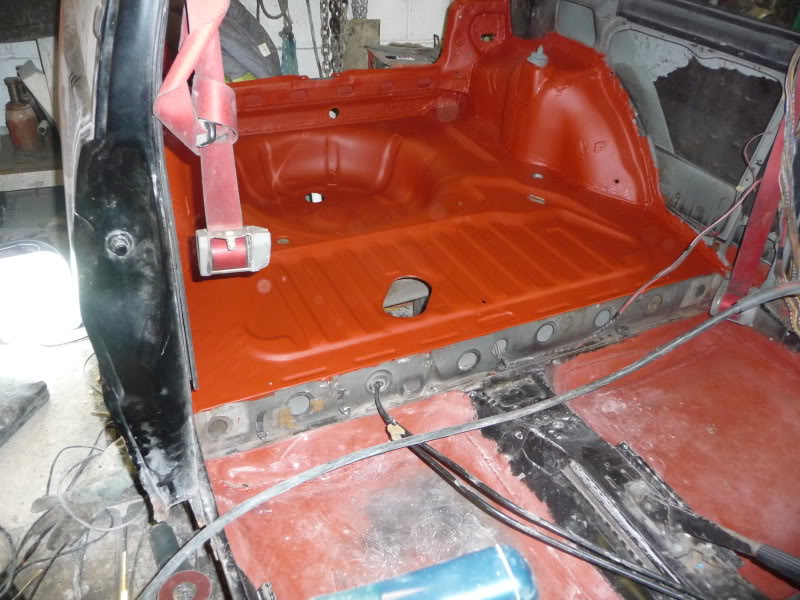
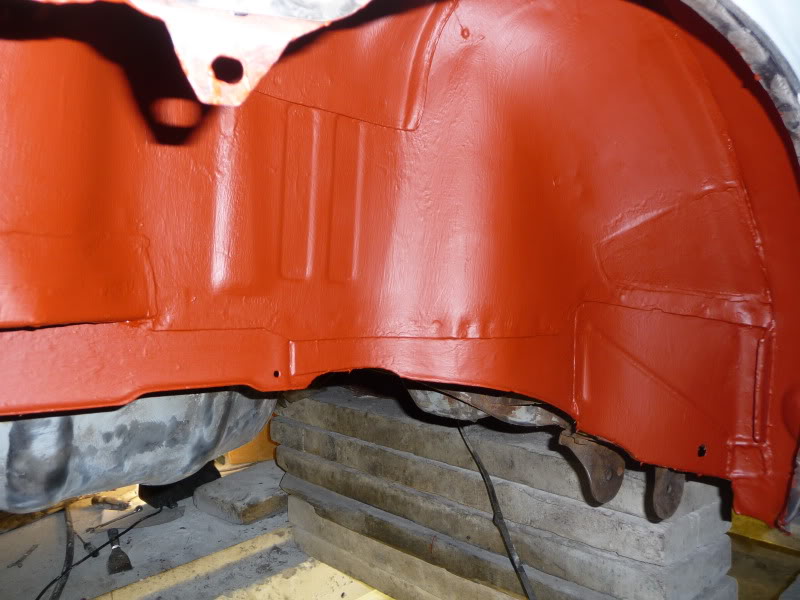
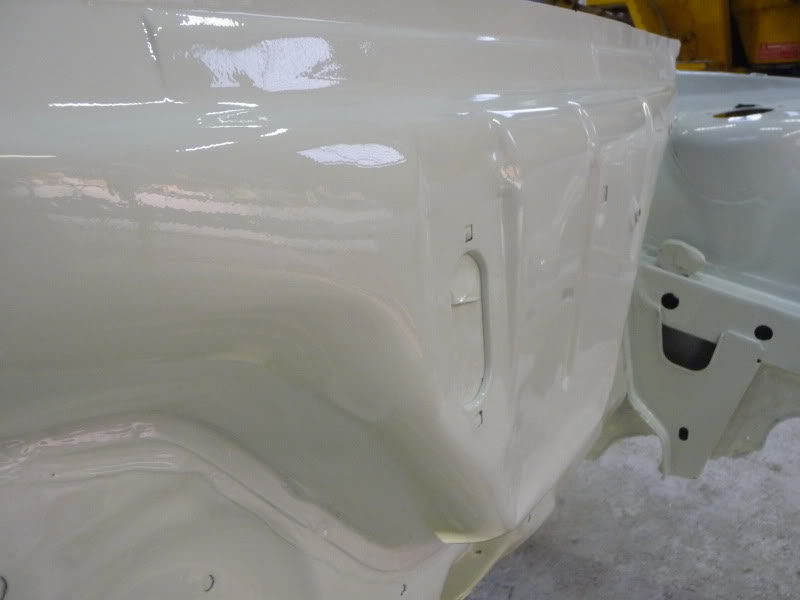
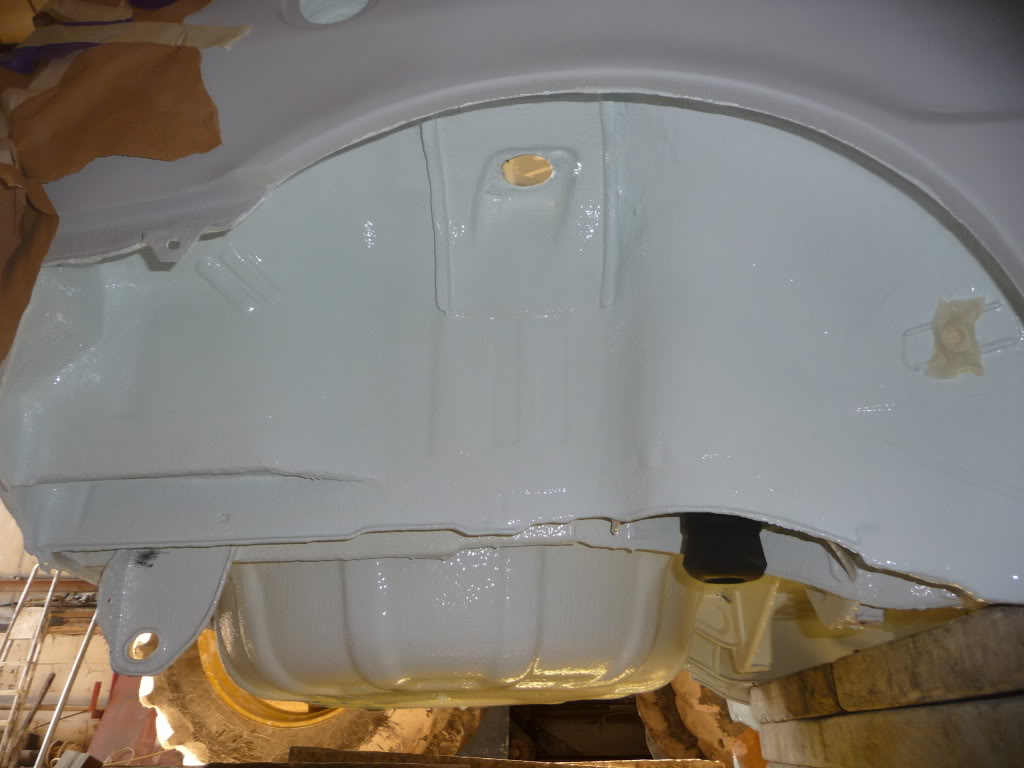
The floors have come out alright-ish, i just have a few bits underneath to finich and they should be done.
I have also decided not to rib them now as tbh i dont think they need it.
The floors are tough,very tough, because i have used the thicker metal and i would say you could proberly jack up on the floor now without leaving a dent
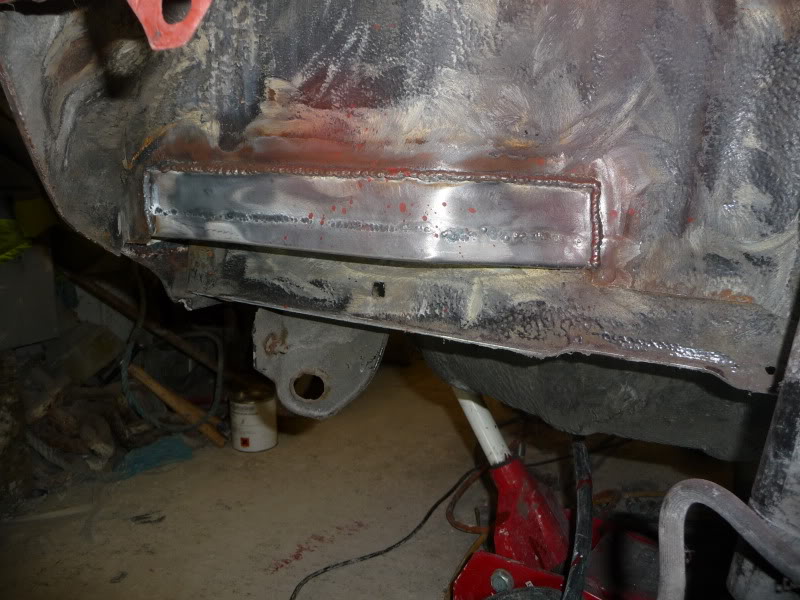
I have seam welded an upside down L shaped piece of metal down the inside of the repaired inner seals to give myself a small 10mm-ish overlap to seam weld the floors to.
This has also strengthened the inner seal up abit aswell.
I have also left a 10mm overlap around the rest of the floor panels to help ease fitting and have fully seam welded them on the top and bottom.
The rear floor panel is the larger piece that i have slid under the cross member that runs across the car and welded that to it, and then the front floor panel is welded on a 10mm-ish overlap of the rear floor panel.
Its obviosly not pretty but should be fine for a good few years motoring.
I will try and get some pics tonight as i have forgot to take the camara with me so far,but i can say i will never be doing this again as its a proper **** of a job and using the thicker 1.6mm metal has just made it even harder.
On the plus side i have only had to use the fire extinguisher twice
Heres some pics.
Still some tidying to do and weld across the front underneath but mostly done.


I had thought about a vent of some type but i think i am just going to raise the back of the bonnet up with some spacers like i did to my last uno, as i think this helped it out a little.
As for updates i have got a fair bit more done but once again i have not taken the camara so will try and get some pics soon.
I was having a little count up of how many different pieces of metal and panels have been welded into the rotter so far and i think i was up into the high 20s low 30s
I have also got though over 5kg of welding wire already!
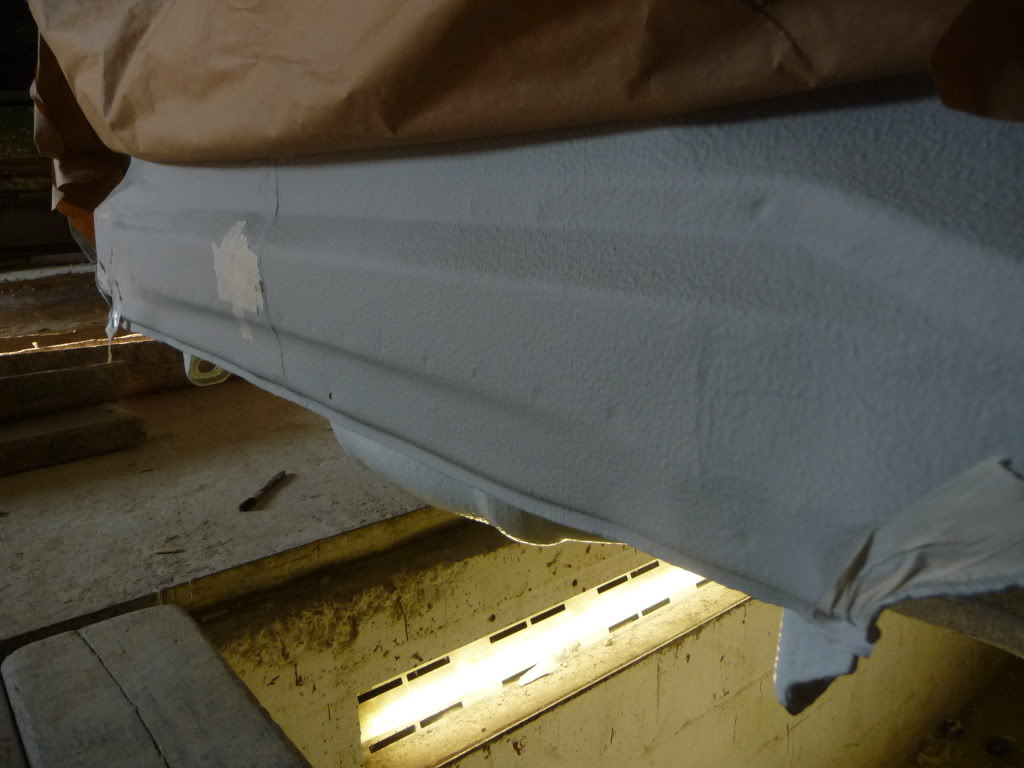
Got a lot of cleaning up still to do and body filler the rear archs etc and put on the drivers side sill and look at the passenger door,but i am gettng there.
I am going to try and get my cousin to help me with the body filler as i am crap with the stuff and he used to work in a bodyshop.
I just hope it comes out alright once filled as i have never welded in repair panels before and tbh i aint got a clue what i am doing lol.
I have fully butt welded in all the repair panels and ground the welds down,i just hope this is the right way to do it as some people say to overlap?
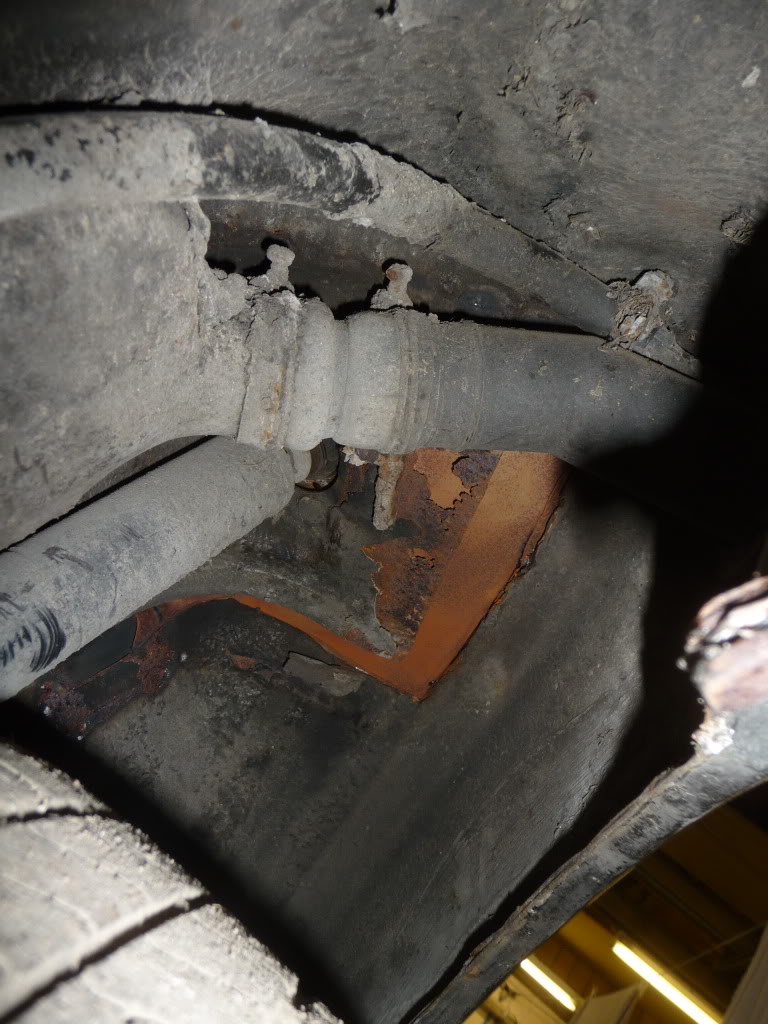
I have also had to repair both inner arch lips and weld in a new fuel filler panel and repair the inner behind that aswell, plus multiple other holes that have appeared.
Hopefully most of the repaired rear arches will be hidden behind the plastic arch lips so am hoping it will look ok-ish.
Its a complete nightmare tbh and about 1000 times more work than i thought it would be,i just hope it will be all worth it in the end.
Heres some pics,proberly not how everyone would do it but it seemed the right way at the time lol.
And like mentioned above i have not really got to much of a clue as to how i should be doing it.
Never the less it should be ok for a good few years motoring.
Still lots of cleaning up to do and seam sealing and paint.
Most of the patches are butt welded in but a few are slightly over lapped (wheel arch bottoms) for ease of fitting in the tight space.


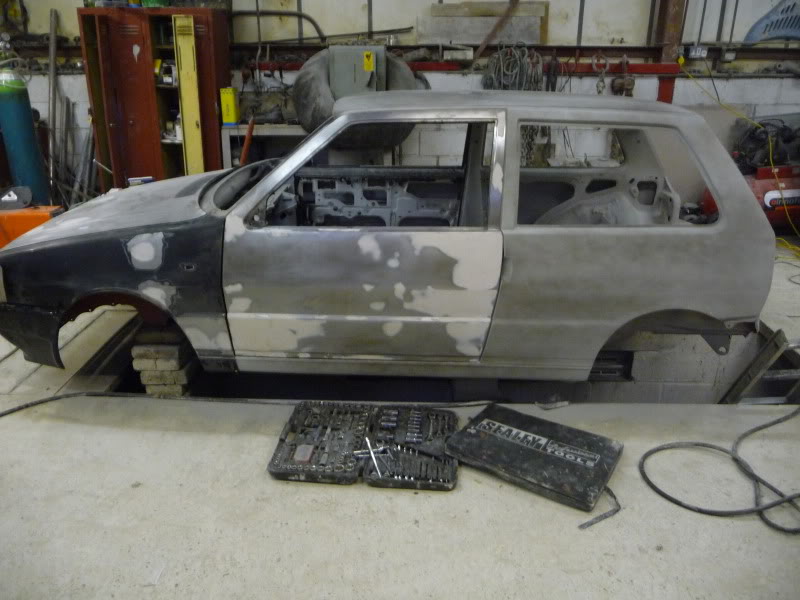
Got a few more bits done but spent most of my time with a grinder and wire brush taking the paint of the rear quaters and doors.
The car in the past had been completely skimmed over with filler over a couple of layers of old paint and i was not happy with it as it looked horrid.
The trouble is where i have been taking the paint off i have discoved 23 years worth of dents
Still its a lot better of a base to start from as the filler/paint before all over the car was so thick in places it would have been hard to blend it all back in.
Even the de-locked doors were just a 3mm alloy plate riveted over the hole from the outside of the door and filled over!
I have also had to repair the doors in places,one door was rust in a corner but luckerly i had a spare knacked door with the car and it just happen that the only good bit left on this knacked door was the part i needed, so i unpeeled it and grafted it into my good door.
The other door was just starting to go off along the bottom so i have welded a piece along there aswell to hold it together for a few more years.
It was not to bad but i thought i would get something on it before it all rusted completely and came dethached.
Heres a few pics...


gtirx2- Moderator
- Posts : 300
Join date : 2013-01-27
Age : 41
Location : Kent -
![]()
![]()
Re: Mk1 uno turbo how it started
![]() by gtirx2 Sun Jan 27, 2013 12:32 pm
by gtirx2 Sun Jan 27, 2013 12:32 pm
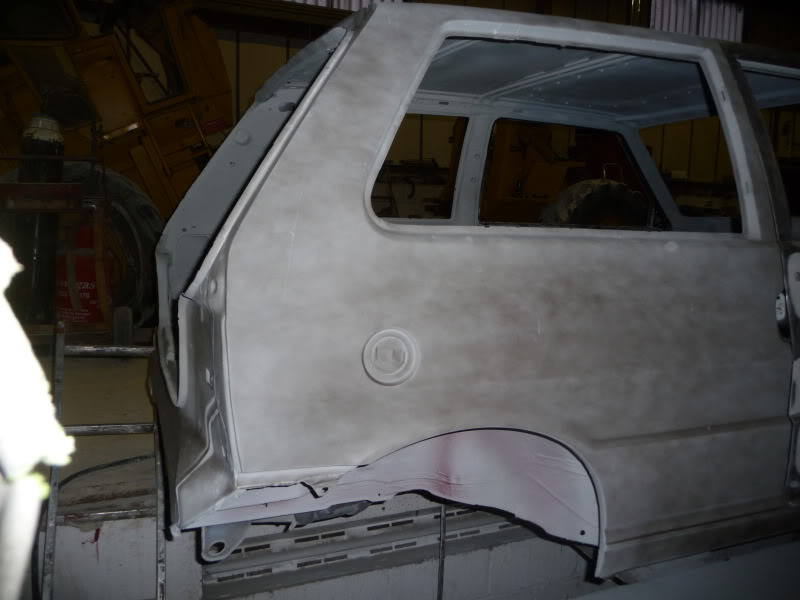
I have gone back to bare metal on the doors and rear quaters now to make things a little easyer and have mostly been trying to get off all the old sealer from under the rear of the car and archs,what a nasty job that one is lol.


In these pics they are not fully cleaned up, but you get the idea.

I am cleaning up the rusty parts the best i can then using bilt hamber deox gel to eat the worst of the rust away then using there hydrate 80 to hopefully slow down the rust in the future.
After the above everything is getting a good few coats of red oxide then seam sealed and finally stonechipped /undersealed,just hope it all sticks together but all is looking good so far.
I have also dug out my old strut braces from my old uno but i had already attacked them in the past and had converted the rear one into a rear brace for a sunny.
I had also cut up the front one for an under brace for the sunny that never got finiched but luckely i had saved the mounting brackets.
The rear one has now been remade into an uno one and is welded in place and i have remade the front one using a piece of box section

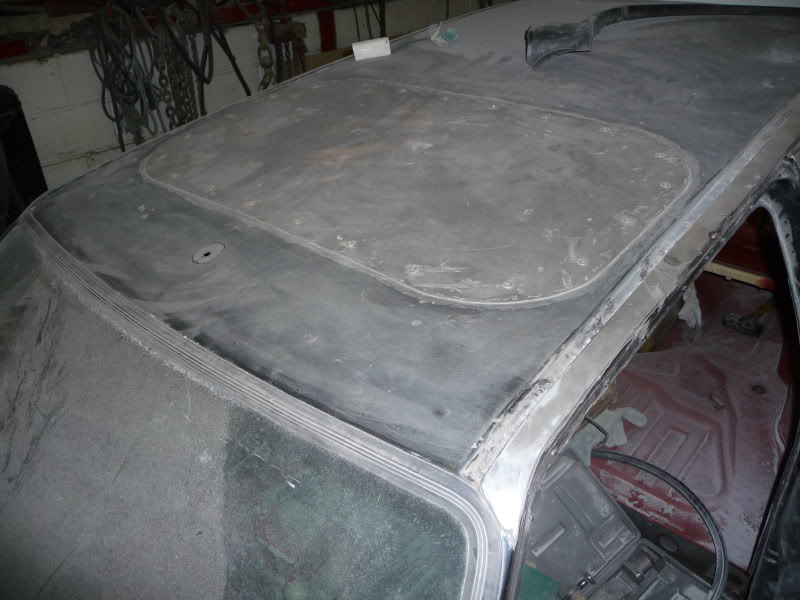
Also for the sunroof i have decided to just remove it and rivet a plate over the top.
Proberly not to everyones tastes but tbh i dont mined how it looks
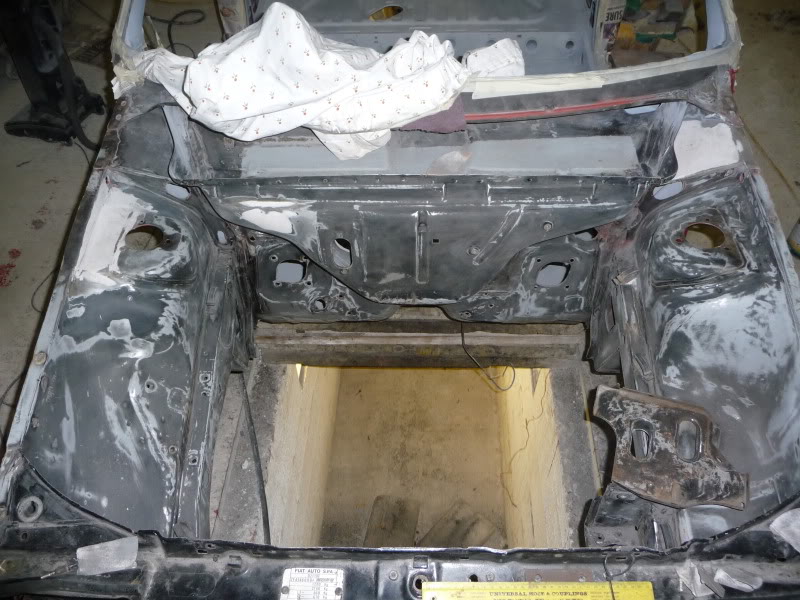
Well i think my shell is now structurally solid and the welding is finally finiched
Everytime you think you are done another rust hole would pop up but after a couple of holes in the bulk head i think i am finally there.
At the moment the car is a completlly bare shell,something i should of done from the start tbh as it seems i have got some burnt in grinder marks in the windscreen which i should of took out from the start
Saying that i was not planning to strip or mess about (removing old paint and underseal and painting etc etc) as much as i have and originally i was just going to be knocking it together to get it on the road, but somewhere along the line i have come off the 1-2 month plan i first had
I have already used more than 5 litres of red oxide and 3 1/2tins of seam sealer and i have not even painted or seam sealed the underneath yet!lol
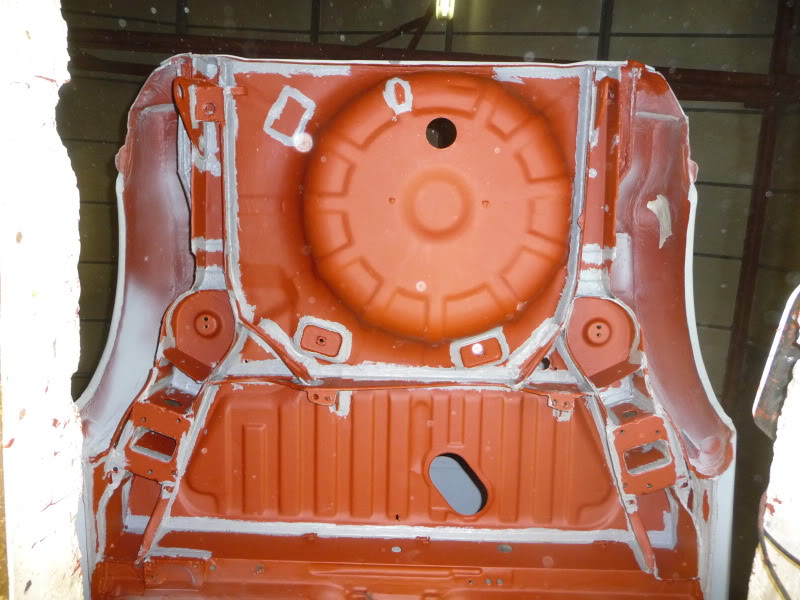
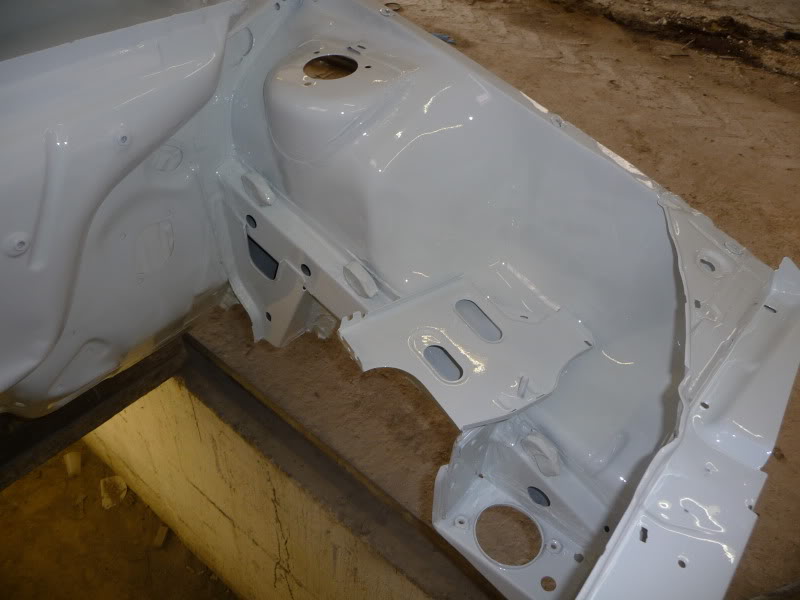
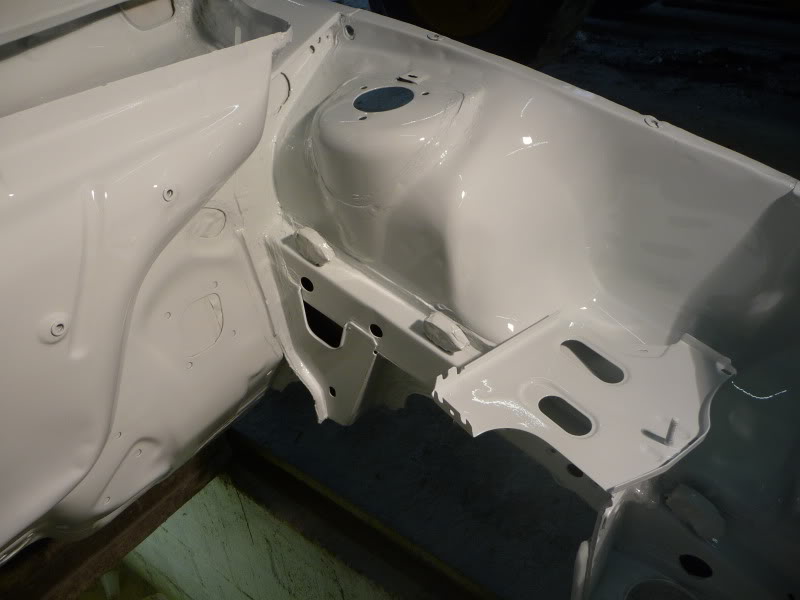
I have been mostly grinding down the welds, cleaning, seam sealing and painting things up on the inside and getting the arches ready for the stonechipping stage.
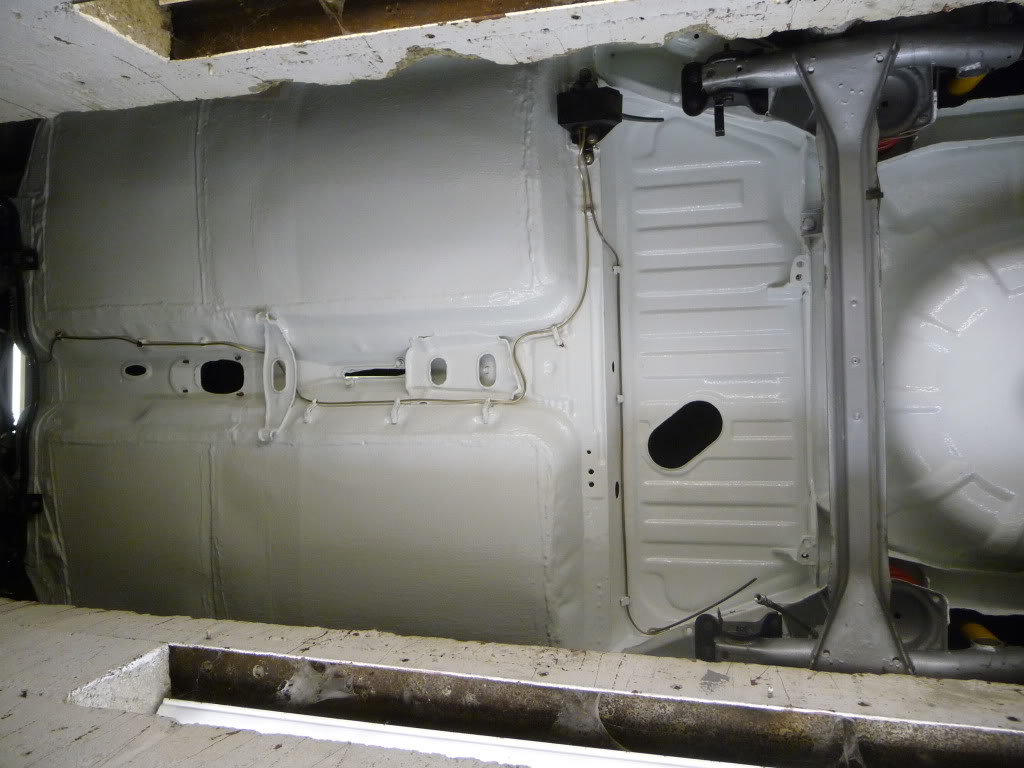
All the inner arches and complete inside from the windows down have been heaverly painted in red oxide and then seam sealed.
I have then 2k primed the whole of the inside of the car and am next going to stone chip all the floors and boot floor then finich in 2k gloss to try and stop the rotter from rusting.
I am still yet to finich the underneath which still needs a lot of cleaning then it will get the same treatment as the arches.
I am also sanding down the engine bay atm to get that ready for a 2k prime and seam sealing,then i just need to finich the rest of the shell which i have started sanding, and then etch prime the bare metal and then 2k prime.
Then i can check/finich the filler work and flat it ready for gloss.
The rear beam, calipers, shocks/springs etc have all been painted up in hammerite and the calipers have been worked in and out and checked and are all working perfect.
I have also poly bushed the rear beam and have made up new copper brake pipes and am using new rubber brake hoses back there aswell.
The front subframe is completely stripped atm awaiting the same treatment and i have stitched welded the front wisebones.
The front wishbones and front hubs are all fairly new items with good bushes so they will be staying but i am changing the ball joints and track rod ends and using new inner and outer anti roll bar bushes.
I have also removed all of the wireing looms from the car and i have repaired and checked 3 of the 4 looms which is an horrible job,if it ever runs again it will be a small miracle
Heres a few pics of the 2 tone primed inside and arches ready for stone chipping...


gtirx2- Moderator
- Posts : 300
Join date : 2013-01-27
Age : 41
Location : Kent -
![]()
![]()
Re: Mk1 uno turbo how it started
![]() by gtirx2 Sun Jan 27, 2013 12:33 pm
by gtirx2 Sun Jan 27, 2013 12:33 pm
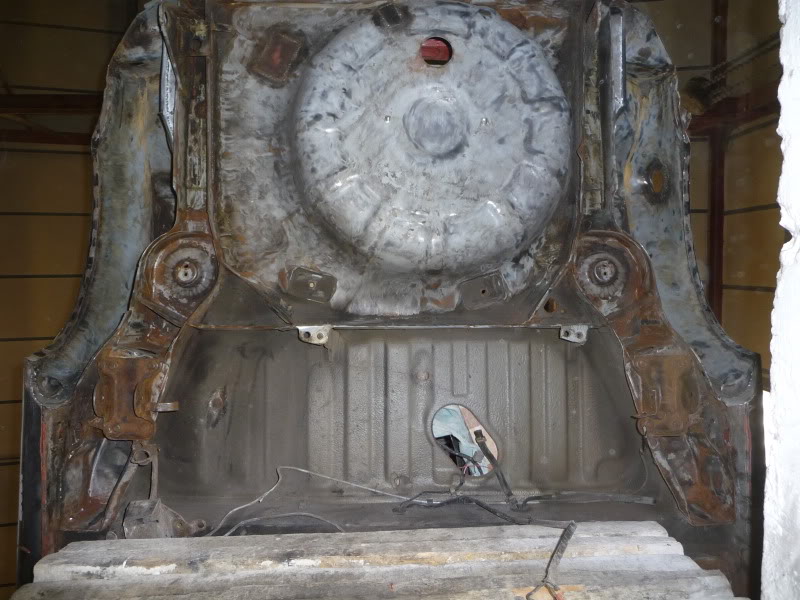
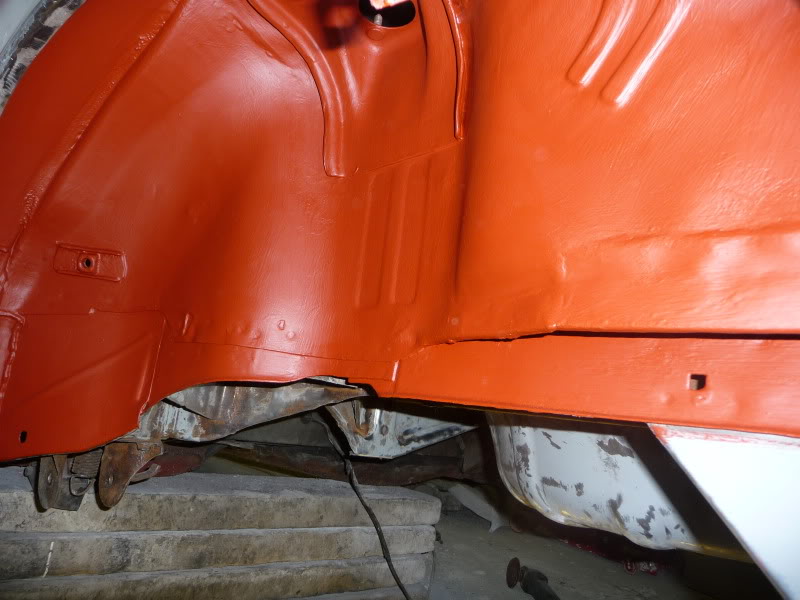
I have mostly been attacking the engine bay atm and repairing a light slap that its had across the front,nothing major but still a pain in the **** lol.
I have also had to repair the parts that i had removed from the front cross member when i was trying to mount the gtir intercooler.
As plans have now changed on the intercooler idea, and that i had to repair the cross member anyhow i thought that i would front mount an oil cooler there instead.
My gtir has now kindly donated its 13 row mocal oil cooler!
As for the new intercooler,like mentioned in another thread i have luckerly managed to pick up a second hand but unused mk2 pace intercooler.
Its also taking me so long as i think its possibly been painted under the bonnet more than once, and has over spray from an old respray under there.
I am having to first sand it all down with 120grit to get to good paint and blend it all in then i have wet sanded it with 500grit before painting.
I have also had to fill a couple of areas to smarten up repairs and a dent.
There is one big dent though, in the heater bulge in the bulk head (proberly from a rear gearbox mount failture) that i have left as it is unseen once the engine is fitted and will give me more clearence for my turbo heat shield,plus i dont think it would of came out easy and would of needed alot of filler so it was best left alone.
I have also stripped the old engine out of the car and it turns out that the pistons are not actully melted atall.
I am at a bit of a blank atm as to why it was smoking and missing so bad as there are no obvious reasons why.
The smoke could well have been the turbo as it has masses amounts of play or even a valve seal that i found floating free on the valve,but i am not to sure why it was missing so bad.
The headgasket looked fine also but the cam was pretty worn,maybe it was a valve clearence issue but i never checked the clearences before i stripped it.
Anyhow a couple of good things have come from this engine,the first being a bosch starter moter, which once stripped is in good condition with better brushes than the first starter i clean up so i will now be using the bosch starter.
The second thing is the cylinder head,the fellow i brought the car off did mention a stage 2 head when i brought the car, but i thought he ment one of the spare heads that came with the car.
It turns out it was the head on this engine,it does have the usuall small cracks between the valve seats but all the heads i have and have used do, and they have all been fine.
It also has some very very faint det marks and could possibly do with a second skim but other than that its a very nice head indeed.
I am still part way through cleaning it up, but i am pretty sure its got all new valve guides in it and the port work looks to be done to a very high standard.
I will proberly save this head for the future and first see how my engine runs then i may swap heads and use an uprated cam.
Heres a few pics...
Heres a very early pic of when i first started sanding the engine bay with 120grit,i should of took more pics of the process but i was to pissed of with sanding to get the camara out to take pics lol
Here it is in max meyer 2k primer but all the bare metal parts where first painted with pro spray etch primer first.

And all seam sealed up,the seam sealed areas will proberly get another coat of primer yet though.


A few comparison pics of a stock mk1 intercooler stock mk2 intercooler and mk2 pace intercooler.


And a few pics of the head,not sure how you tell what stage it is but the previous owner said a stage 2?
Still needs the valves grinding in and proberly another skim.


Oh and the starter lol

gtirx2- Moderator
- Posts : 300
Join date : 2013-01-27
Age : 41
Location : Kent -
![]()
![]()
Re: Mk1 uno turbo how it started
![]() by gtirx2 Sun Jan 27, 2013 12:33 pm
by gtirx2 Sun Jan 27, 2013 12:33 pm
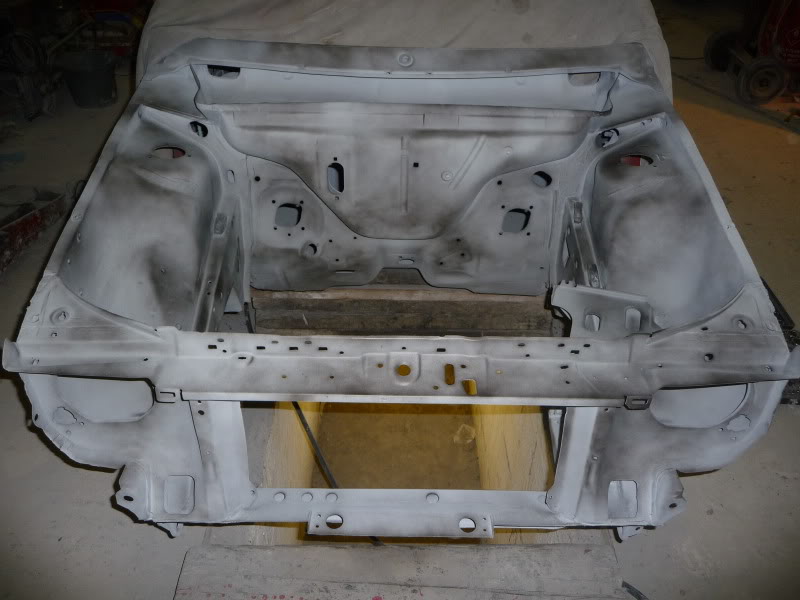
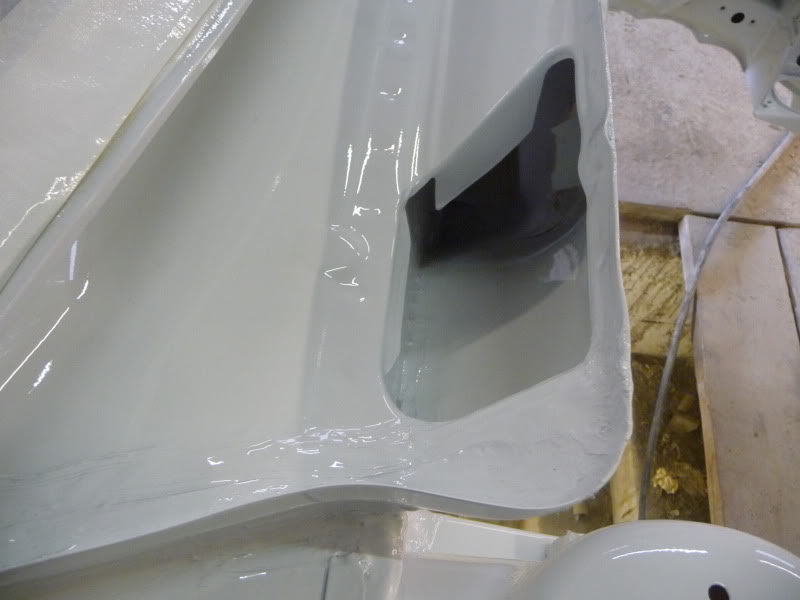
I have finally got the main shell in primer and guide coat but there is still a lot more work to be done here yet, and I still need to get the rest of the panels prepped and painted aswell.
I have also mocked up the front end to check panel gaps etc and have decided that I will be going with the holed look in the front bumper
I have also been back under the car to finish off getting the last of the old underseal off and slowly getting it painted and seam sealed ready for stone chipping.
Also a couple of weeks ago I was just sniffing about on ebay and a set of 14x6 35offset fiat fitment compomotive mo 5’s popped up with usable tyres on there, but there was no pics and they was also miles away from me in wales lol.
In the end I just thought fcuk it and went for them as they are one of my favarite style rims and the seller said the tyres were still useable, and I also think they are a pretty hard wheel to come by in a uno fitment?
Anyhow after 6+hours and a 412mile round trip I had a very grotty (half moss green and very flat paint) set of wheels
The tyres aint great either but are still legal and should be good to get me going and overall are in a lot better shape than the team dynamics dtm’s with bald tyres I had before,or there was them 3 spokes hhhmm
I will proberly give the wheels a refurb when the car is done and I know everything is ok with the thing, but for now I have just given them a dam good t-cut and touched in a bit of kerbing that was on one wheel.
There is also some flakey paint on the back of a couple of rims and a small bit on one of the spokes that looks a bit cack but overall I am pretty happy with them tbh
Especially considering what they looked like when I first got them, and they were resonabley cheap at £85 i thought.
Heres some pics…
Front bumper

Shell
Underside cleaning

Hydrating

Painting

Seam sealing
Still got to paint the seam sealed areas then it will be ready to stone chip.
Wheels


I have got the rear all stonechipped and painted now and am pretty happy with how its turned out really.
I have 2k top coated it in the end as the original white stonechip finish is a very flat matt looking white,i have never used white stonechip before but i though it woud be a bit more shinny for some reason.
I am glad i have top coated it though as it looks a whole lot cleaner under there now and the smoother surface should help it keep the muck off a lot better.
I used the short nozzle gun this time for the stonechip, and the finish is a lot more smoother than what i did on the gtir with the longer nozzle gun.
Even so I will proberly use the rougher longer nozzle gun for the black I want to spray under the arches, as it should offer a bit more protection from being gravel blasted from the wheels.
I have still got the front floor to do as i cant do it in one go as the rest of the car is on blocks, so i need to move them around to get there.
Its ready to go though just needs stonechipping and painting.
I was looking in charlies thread and that spitt that he used is really the best way to do the underside if anyone thinking about it.
Even in a pit it has been a pain in the **** from start to finich tbh.
I have also reprimed the seam sealed areas under the bonnet and guide coated it ready for flatting.
I have missed a few photos here as I did not take the camara, but after the seam sealed areas were painted over it was stonechipped and also had to be plastic primed before the top coat.
All that’s left back there to do is waxoil the cavitys.


gtirx2- Moderator
- Posts : 300
Join date : 2013-01-27
Age : 41
Location : Kent -
![]()
![]()
Re: Mk1 uno turbo how it started
![]() by gtirx2 Sun Jan 27, 2013 12:34 pm
by gtirx2 Sun Jan 27, 2013 12:34 pm
It took me silly hours to get all the primer flatted back for paint.
I started with the 500 grit but had gone through the primer in a couple of places due to the tricky shapes under there, so I re- primed these areas and then also re-primed the whole engine bay again with another thinned primer coat and guide coated it again to wet flat it with the 800 grit this time.
Once this was all done, I then stonechipped the front cross member,bottom of the bulkhead and along the bottoms of the chassis legs.
Along the way the engine bay was cleaned/panel wiped around 7-8 times and tack ragged before paint.
Now to the paint, I was seriously bricking it before doing this as tbh it is way beyond my capabilities with a spray gun and the largest thing I have painted before with 2k paint that has really mattered was a rocker cover for my gti-r.
And to come this far to balls it up badly would of killed me.
Luckily I think I have just about winged it somehow
It is obviously not perfect with imperfections of every kind on it in some place or other, even a tiny **** fly managed to find it way on there
The place I am spraying it is also not the best as it’s a dusty quarry but even so I am more than happy with it for the engine bay.
The one thing that did piss me off a little was I had a small reaction in a few fish eyes in a couple of areas, and after cleaning it like a mad man for many hours its just annoying when you have tried your best
Even with all my doom and gloom I think it has turned out pretty well considering I was doing it
I dust coated it first then let it go tacky, then blasted a good solid coat on and on the last coat I went for broke and put it on as heavy as I could to try and reduce orange peel, but it’s a bit of a balance between that and runs.
Its still a bit orange peely but that’s to be expected really, especially with all the tricky shapes and the overspray that you get in there.
Heres some pics…
Worst first and starting with some runs, lucky for me these and one small run on the front panel are the only ones I can find.
Thank god they are hidden under the battery tray but you have got to admit these are some good runs
Then for the fish eye reactions,these really annoy me but this is the only place that it has really happened like this and are under the headlight thankfully.
I had already primed and painted inside the heater bulge from inside the car before I did the engine bay but it got a bit more paint down there on this pass aswell.
I had also primed and painted under the scuttle panel ages ago the best I could with an air brush and a mirror so that should be protected under there aswell.
It’s a but orange peely but I am just relieved its come out alright, considering how much I was stressing about it before hand.


gtirx2- Moderator
- Posts : 300
Join date : 2013-01-27
Age : 41
Location : Kent -
![]()
![]()
Re: Mk1 uno turbo how it started
![]() by gtirx2 Sun Jan 27, 2013 12:34 pm
by gtirx2 Sun Jan 27, 2013 12:34 pm
As for the weight of the thing i have been worrying about that a bit aswell tbh,as this is what makes these cars so much fun to drive.
Not due to the welding wire though as a lot of that has been ground away, but mainly due to the thicker 1.6mm floors and the ridiculous amount of paint and sealer i have been putting on the thing:lol:
Still i should be able to lose a bit of weight elsewhere to make up for it,and i am also hopeing to get around 160bhp when its all finished.
Anyhow I have got a bit more done over the last few days and have finally finished the underside and arches.
The front floor is now all finished and overall I am pretty happy with the results.
Deep down I would proberly prefer a nice stock looking floor, but on the other hand I am now pretty certain I wont have no troubles with this beasty rotting out any time soon.
If I was to go back and do it all again I would proberly try and butt weld it in but where the metal was thicker I think I would of struggled, and being my first time at attacking a car to this degree I think it has came out alright-ish tbh.
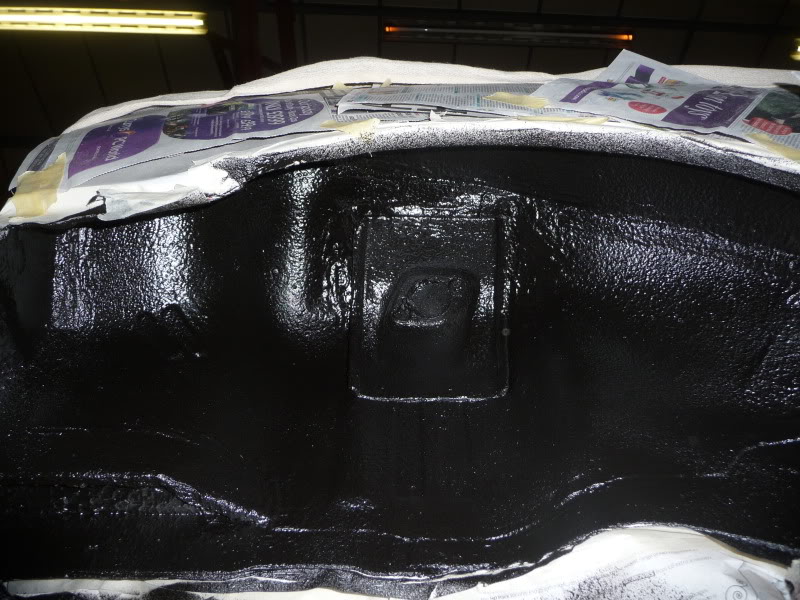
I have also finished the arches and this time used the long nozzle gun to apply the stonechip,as I wanted a rougher finish to help provide more protection from being gravel blasted by the wheels.
I am not going to top coat the arches as where they are the most likely places to get damaged I think it maybe easyer to patch them up in the future if I leave them as they are.
I also seriously under estimated how much stonechip I would need to get a good coat on the thing.
In the end I used 5 cans on the rear end up to the fuel tank area, and then another 6 for the rest of the floor, and to do all the arches I got through another 6 cans lol!
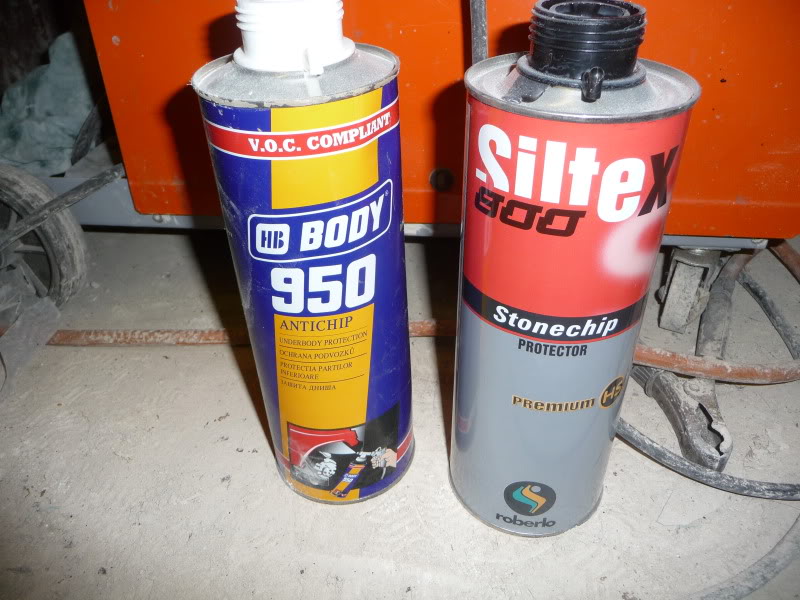
The other thing I have noticed is the complete difference between the two different brands of stonchip I have been using.
The white I have used on the floors is made by hb body and is a far thicker materal than the other one.
This stuff is good but I found that it would sometimes go on a little dry looking and be a bit oversparyey at times, what ever the pressure.(Recommended was 5-6bar)
On the plus side I found it pretty controllable and you could sort of build it up nice in a couple of coats and get a reasonable finish.
The one thing that was a bit annoying is that you have to plastic prime it before top coating, is this the norm for stonechip?
http://www.hbbody.co.uk/content/index.php?option=com_k2&view=item&id=10:body-950&Itemid=16
Then to the other black stone chip which is made by roberlo,this stuff is a lot thinner than the hb body.
It seems to cover more area per tin a bit better than the hb but it does seem a bit all or nothing, and goes on very wet compaired to the hb, it also takes longer to dry.
I tried it with the the short nozzle gun aswell to get a fair comparison and it seems harder to get a smooth-ish finish (not that it mattered on the arches)as it goes on so quick and wet.
I also tried this at all pressure from 2bar-6(recommended was 3-4bar I think)
It also has no mention of having to plastic prime it before top coat?
http://www.grn.es/roberlo/cataleg/cataleg.php?cat=309&lang=2&ccat=30
Know I still need to stonechip my outer sills and a few other noticeable places and am not sure what to use.
It’s a bit of a pain in having to plastic prime the hb body tbh so am thinking about the roberlo,or should I be trying another make of stonechip?
Maybe that upol gravitex?
What have you guy used and what were the results?
Here some pics…


gtirx2- Moderator
- Posts : 300
Join date : 2013-01-27
Age : 41
Location : Kent -
![]()
![]()
Re: Mk1 uno turbo how it started
![]() by gtirx2 Sun Jan 27, 2013 12:35 pm
by gtirx2 Sun Jan 27, 2013 12:35 pm
The front subframe, wishbones, hubs, calipers etc have all been cleaned up and painted heaverly (runs
Its had new inner and outer anti roll bar bushes,track rod ends and ball joints and I am changing the wheel bearings aswell.
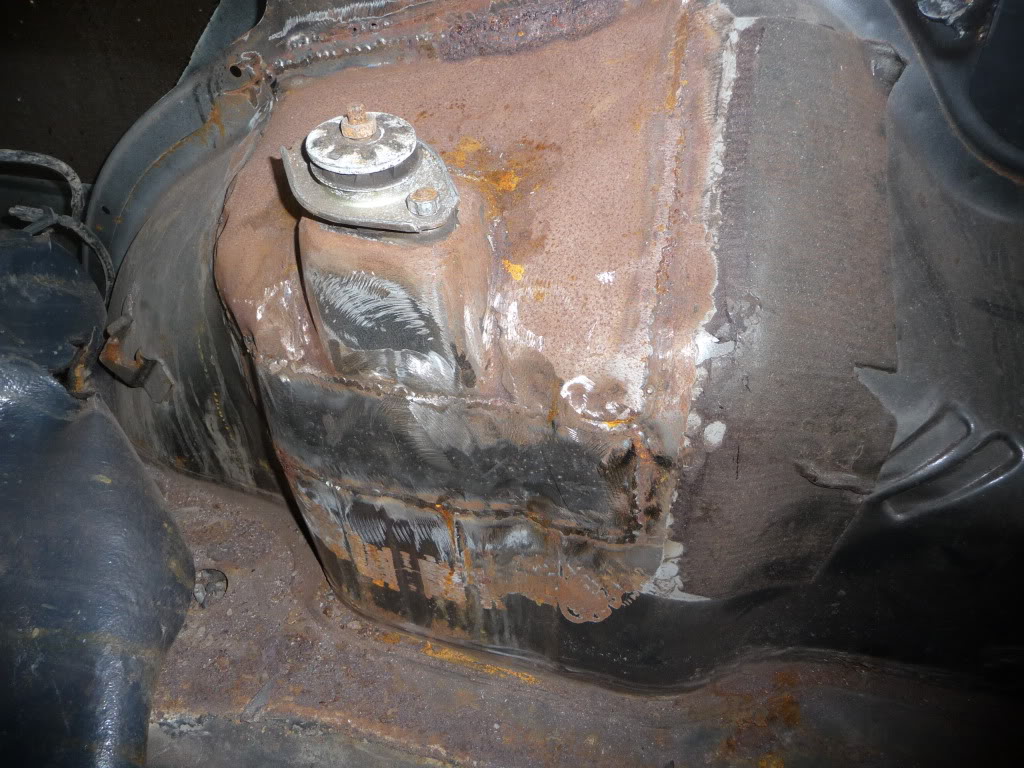
I also had to change the rear gearbox mount as the old one had been welded up solid!
The rest of the bushes where in good condition as the fella I brought the car from had put new wishbones and hubs on it just before he took it off the road.
The steering rack I had to change out for my old one of my old uno, as the one that was on there was not the turbo quick rack.
I have re-greased it and checked the slipper clearence in the rack and all is good.
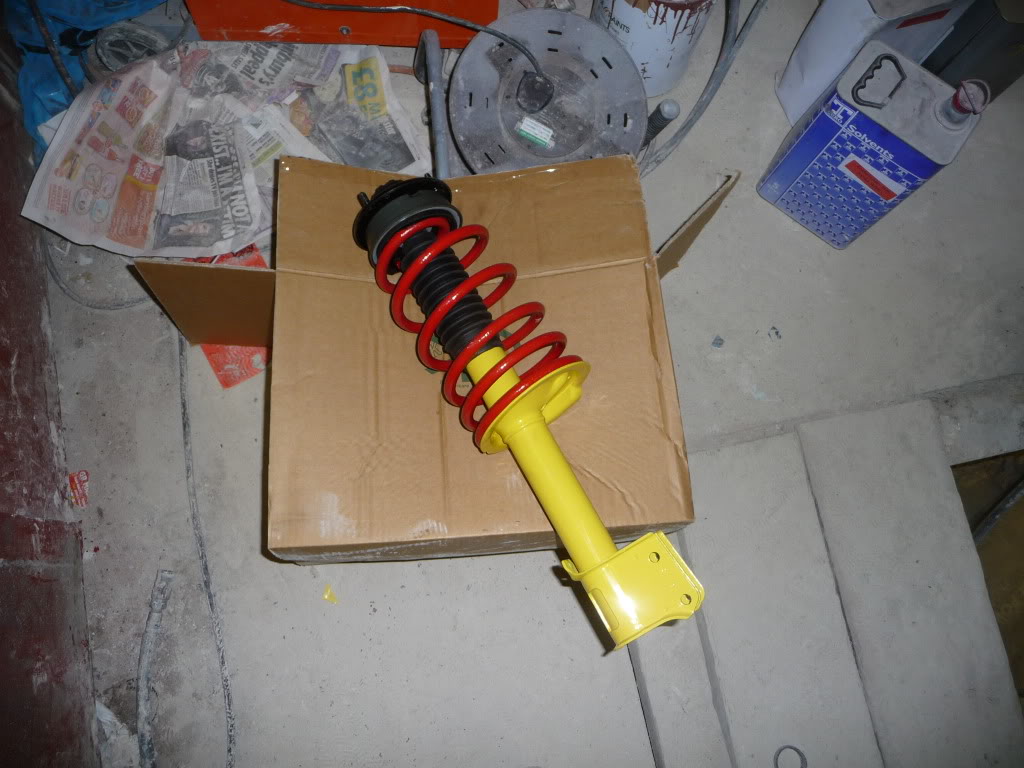
As for suspension I have used my old gmax front shocks off my old uno which had only done around 3000miles, and given them a fresh coat of paint in john deere yellow
I am also using some trimmed down universal steering rack gatiors for dust covers for the shocks, which I hope will work ok.
For the springs I had the choice of a few sets but have decided to use the chassis dynamics/avo springs that I had on my old uno, as I quite liked them tbh and am happy to stick with what I know.
These where cleaned back to bare metal and left to soak in some deox c rust remover then red oxide primed and then painted massey ferguson red
It will also have new brake hoses and ferodo discs on the front and some apex pads that came with the car.
The rear beam has had the same treatment as the front with the hammerite and runs combo(I hate hammerite
There is all new brake pipes back there aswell, the same as there will be through out the rest of the car.
As for the rear shocks I did not what to spend a fortune as its mostly going to be a road car, so have taken a gamble with some cheap uprated qss shocks from abacus performance on ebay.
The quality seems pretty good, and if I was a betting man I would say that they are out of the same factory as the gmax stuff by the looks of them.
Time will tell if they are any good, as for the springs they will be the same as the front.
I have kept the old rear discs as they still have life left in them, but am using new ferodo pads.
I have also waxoiled the front chassis legs and a couple of cavitys at the back, but the rest of the waxoiling will wait until the car is painted.
Heres a few pics, I will post up some more up when I finally get it back on its wheels.
Still some touching up to do here and there as a few things have been knocked about a bit where they have been sitting around a while waiting to go on.
I don’t want no jokes about my ronald mcdonald looking front shocks, that look like they come free with a happy meal :humhihi


Heres a few more piccys,finally back on its wheels now and starting to look like a car again
Sitting a bit high and looking like a bit 4x4 ish
Also been making up some new brake pipes and me fingers are now sore from bending all the pipes,still some finshing to do but pretty much done.
Just hope that they are right and clear everything as i ripped the old ones out and bent them out of shape in the process.
I have kept them as close as possible to the master cylinder for space, but just looking back at some old photos and i think i proberly had more space to play with than i first thought.


gtirx2- Moderator
- Posts : 300
Join date : 2013-01-27
Age : 41
Location : Kent -
![]()
![]()
Re: Mk1 uno turbo how it started
![]() by gtirx2 Sun Jan 27, 2013 12:35 pm
by gtirx2 Sun Jan 27, 2013 12:35 pm
As i mentioned this stuff seemed a lot thinner than the hbbody stuff and this was proberly due to a higher solvent content and is just no drying(its had 2 weeks and is still very very soft).
It has basicly eaten into the red oxide and seam sealer under it and softened it all up and is not drying.
To make matters worse where it has softened the paint so much it now just peels straight off with all the red oxide and seam sealer paint that is over the hydrate 80 areas
To say i am fully ****ed right off is an understatement,and am so close to kicking the living ****e out the thing and packing it all in tbh.
This is the lowest of low points that i think i can get to with this car,and i am proberly going to have to strip the subframes back of it and remove all the stonechip in the arches and start all over again
Its taken me so long to get them to where i had them and am not sure if its in me no more
****ing thing
I will phone the paint shop tommorow but i cant see them having much to say,and having 2 weeks to dry with no change and being able to peel it off the hydrated areas obviosly aint right.
I just pray i can hold my temper when i next see the thing, as i have already squared up to it many times in the past

Well as for updates on the rotter I have just about got all the stonechip back of the arches, and the fronts have been reprimed and seam sealed ready for stonechipping again, with the rears still left to do.
The main update though is I have picked up yet another rotter lol, which I think is going to become a donor for parts for my one.
This car came with a load of spares and the main reasons for buying it was for the front bumper and running engine,plus it was only 10mins up the road from me.
I beleave this car has been sitting around for 6 years and the previous owner was slowly welding it up, but realised that he was never going to finish it so sold it.
He did say the engine runs though but has a fuel pump problem.
The shell is not in very good condition at all, and the welding that has been done has not been done to a lasting standard imo,it also has a slightly bent chassis leg.
Its annoyingly proberly has better condition floor pans in it than my one had though
Trouble is now going through all the parts I am not sure what direction to take with mine now
I am considering having a complete interior in it now instead of the stripped out rear and foamex door cards that i was planning.
Trouble with that is i have cut some brakets for the back seats out that I would have to replace, and also have to add a harnness nut spreader plate thingy on a patch I have put in the back inner arch for a seat belt mounting point.
Its the time to do it though if I am going to as I have had to remove all the stone chip of the rear arches now anyhow.
The next thing is the top change box hhmm, I know what everyone will say but I like the bottom changers and have got loads of spares from flywheels to clutches and gearboxs etc.
Then on the other hand the topchange is proberly easyer to replace if the punto gt box fits aswell or am i getting confused?
I have read the linkage is different but I think they maybe interchangable?
The other thing is the wireing looms,this one has the plain white engine looms in it which I swear seems to be of better quality that the coloured looms that I have atm.
Its going to take me weeks to work out what I am going to use now lol.
It is very handy for a few odds and sods though having this one and gives me more options on what to use, and a bit of a relief having an engine that i know runs.
The only reason it didnt run was because the earths had been disconected in the boot which is where the fuel pump earth is.
The engine seems to run pretty well and sounds a lot smoother than my old unos engine did,but I think it may have an air leak somewhere,even so I am pretty happy with it considering how long it has been sitting.
Another thing I have noticed is the 4inch scorpion back box again.
The bloody thing has a 1 ¼ inch reducer in there again!
You may just be able to see it in the pics.
What a bloody stupid design that is,some scorpions don’t have them in but the 2 4inchers I have got with scorpion stamped on the box have them in.
I would check yours if it’s the same design as it cant be good for the engine?
Here are a LOAD of pics of the beasty(mostly rot shots lol), and even a short vid of it running


And the vid
gtirx2- Moderator
- Posts : 300
Join date : 2013-01-27
Age : 41
Location : Kent -
![]()
![]()
Re: Mk1 uno turbo how it started
![]() by gtirx2 Sun Jan 27, 2013 12:36 pm
by gtirx2 Sun Jan 27, 2013 12:36 pm
I think i have most bits i need now but am unsure if to go for unreliable electric windows or just use the manuel winders,swaying toward the manuels tbh.
Its turning into a complete and utter nightmare this car now, with all the parts kicking about and choosing what to use, from seats and interior parts to looms, gearboxs,doors etc etc.
Its all slowly doing my head in now and is never going to get finished at this rate,and nothing is ever perfect with some parts better in some areas than others.
Like the doors,i got other doors with this new car but none are perfect and would all need work, but in some areas better than the ones i have already spent weeks preping on the other car
Same with the interior,i spent ages swapping seat covers and if you have ever done this you will now what a ******* job that is
That and the stonechip disater it feel like its 1 step forward and 10 steps back,at this rate i wont get it done until 2012 and i really fancy it this summer
I also have a question for you guys,do you know if i can use the bottom change gearbox/linkage with the top change interior plastics,i.e the plastic gearstick suround?
Will the sloppyness of the bottom change make the gear stick catch the plastic?
Heres just a small part of my problems, in sorting through which seats to use and swapping covers and foams around again, and then cleaning it all up.
And them metal ring clip things that hold the covers to the foam are just pure evil to get back together :demon ,looking more and more like 2013 for me, and i can forget about the retro show now

Just finished painting the inside of the rotter today, and now just hoping it all drys ok lol
Bit of a mare to get in all the spaces and there is a few runs here and there, but overall i think it has come out alright.
Was not looking for a top quality job in there anyhow,just wanted some paint in there to protect it.
As mentioned i stonechipped the floors then plastic primed and it was then on with the paint.
I have also cleaned up the top change box i am now going to be using.
After a quick pressure wash it came up pretty clean, and it looks if though it could have possibly been opened up in the past and maybe rebuilt,not sure if that a goods thing or not tbh
Have just given it a quick razz over with the wire wheel on the drill, and think i will just leave it at that instead of painting it like i had first planned.
Heres a few pics.


gtirx2- Moderator
- Posts : 300
Join date : 2013-01-27
Age : 41
Location : Kent -
![]()
![]()
Re: Mk1 uno turbo how it started
![]() by gtirx2 Sun Jan 27, 2013 12:36 pm
by gtirx2 Sun Jan 27, 2013 12:36 pm
Can also report that all the paint on the inside has dryed up nice and hard, but i still wont be jumping in there for a while though just to be sure
Heres yet more piccys...


Also does anyone know if the gold washer on top of the rear suspension mount is the right way up?
It seems the right way to me this, but a picture in the red haynes looks the other way up?

gtirx2- Moderator
- Posts : 300
Join date : 2013-01-27
Age : 41
Location : Kent -
![]()
![]()
gtirx2- Moderator
- Posts : 300
Join date : 2013-01-27
Age : 41
Location : Kent -
![]()
![]()
Re: Mk1 uno turbo how it started
![]() by robr33gts Sun Jan 27, 2013 12:39 pm
by robr33gts Sun Jan 27, 2013 12:39 pm

robr33gts- Over boosting

- Posts : 518
Join date : 2013-01-27
Age : 48
Location : lincoln
![]()
![]()
Re: Mk1 uno turbo how it started
![]() by gtirx2 Sun Jan 27, 2013 12:46 pm
by gtirx2 Sun Jan 27, 2013 12:46 pm
Going to post up another thread on the blue car in a bit,i have a vid of my afm problem i have got and the lumpy idle from the cam lol
gtirx2- Moderator
- Posts : 300
Join date : 2013-01-27
Age : 41
Location : Kent -
![]()
![]()
Re: Mk1 uno turbo how it started
![]() by vern Sun Jan 27, 2013 10:32 pm
by vern Sun Jan 27, 2013 10:32 pm
Top work on it, think I may have thrown the towel in with all that rot lol

vern- Moderator
- Posts : 274
Join date : 2013-01-27
Location : East sussex
![]()
![]()
Re: Mk1 uno turbo how it started
![]() by FRO$TY Mon Feb 04, 2013 12:03 am
by FRO$TY Mon Feb 04, 2013 12:03 am

FRO$TY- Starting

- Posts : 6
Join date : 2013-02-03
Age : 42
Location : West London
![]()
![]()
Re: Mk1 uno turbo how it started
![]() by charliemk1 Mon Feb 04, 2013 12:32 am
by charliemk1 Mon Feb 04, 2013 12:32 am

charliemk1- Uno Veteran

- Posts : 293
Join date : 2013-01-27
Age : 59
Location : Dundee
![]()
![]()
Re: Mk1 uno turbo how it started
![]() by doody Wed Feb 13, 2013 11:25 am
by doody Wed Feb 13, 2013 11:25 am
i love white uno's

doody- 5th gear

- Posts : 316
Join date : 2013-02-04
Age : 48
Location : crowland
![]()
![]()
Re: Mk1 uno turbo how it started
![]() by gtirx2 Thu Feb 14, 2013 8:44 am
by gtirx2 Thu Feb 14, 2013 8:44 am
Tbh i aint got a clue when i am next going to get back on this car,its been a long time now already.
Was just nabbing the suspension off it the other day for the blue one and thought wtf am i going to do with this
Theres 100s of hours in that car,and i learnt alot doing it along the way,but with the blue car now its just completly slipped from my attension.
I am also at my nemesis which is body work,all my cars need something doing bodywork/filler spaying wise and i am just crap at it and find it extremely hard to get right
I am also one that hates taking my cars to anyone or letting anyone else work on them, infact no one has ever worked on my cars other than relatives, that i know i can trust.
I need to get some bits done on my gtir and the blue uno and i am so hard pressed to trust taking it to a bodyshop,i will no dout maybe get my cousin to do it or just brave it myself
Its like this white uno,i think once i have got the blue uno fully done and the gtir on its way back to life i may just have a go at the bodywork myself.
If i cock it up so be it and of coarse it wont be perfect, but i think it would be a prime car for my to try and learn to do these sparying and filling jobs on.
Its an extremely solid shell now, infact proberly as solid as my blue car, but the fact that the white one has been chopped about and had more than a fair amount of work will never make it as desirable as a solid less welded shell anyway imo.
God knows what i will do with it lol,i just hope i dont get kicked out from where it is other wise i will have to sort it quick.
Atm there are still afew bare metal parts on the car bonnet/wings and being in a chalk quarry it stays perfectly dry,the only places that show signs of very light surface rust on the bare metal parts are places that have been fingered/touched in the past.
If this was at my place the whole thing would be red rust within a week
I would also be hard pressed to get rid of it, as even a slow speed crash in the blue one (god forbid
gtirx2- Moderator
- Posts : 300
Join date : 2013-01-27
Age : 41
Location : Kent -
![]()
![]()
Re: Mk1 uno turbo how it started
![]() by robr33gts Thu Feb 14, 2013 8:56 am
by robr33gts Thu Feb 14, 2013 8:56 am
robr33gts- Over boosting
- Posts : 518
Join date : 2013-01-27
Age : 48
Location : lincoln
![]()
![]()
Re: Mk1 uno turbo how it started
![]() by doody Thu Feb 14, 2013 9:34 am
by doody Thu Feb 14, 2013 9:34 am
i hate doing the messy job's
doody- 5th gear
- Posts : 316
Join date : 2013-02-04
Age : 48
Location : crowland
![]()
![]()
Page 1 of 2 • 1, 2 ![]()
![]()

 Similar topics
» Bought a mk 1 Uno Turbo engine, gearbox, turbo & loom
» mk1 turbo
» UNO TURBO MK1
» MK1 Uno Turbo i.e
|
|
|